XtreemFS Installation and User Guide
The XtreemFS Installation and User Guide
Version 1.5.1
XtreemFS is available from the XtreemFS website (www.XtreemFS.org).
This document is © 2009-2015 by Björn Kolbeck, Jan Stender, Michael Berlin, Christoph Kleineweber, Matthias Noack, Paul Seiferth, Felix Langner, NEC HPC Europe, Felix Hupfeld, Juan Gonzales, Patrick Schäfer, Lukas Kairies, Jens V. Fischer, Johannes Dillmann, Robert Schmidtke. All rights reserved.
Contents
1 Quick Start
2 About XtreemFS
2.1 What is XtreemFS?
2.2 Is XtreemFS suitable for me?
2.3 Core Features
2.4 Architecture
3 XtreemFS Services
3.1 Installation
3.1.1 Prerequisites
3.1.2 Installing from Pre-Packaged Releases
3.1.3 Installing from Sources
3.2 Configuration
3.2.1 A Word about UUIDs
3.2.2 Configuration for mixed IPv4 / IPv6 networks and NATs
3.2.3 Automatic DIR Discovery
3.2.4 Authentication
3.2.5 Configuring SSL Support
3.2.6 Running XtreemFS on SSDs
3.2.7 List of Configuration Options
3.3 Execution and Monitoring
3.3.1 Starting and Stopping the XtreemFS services
3.3.2 Running multiple OSDs per Machine
3.3.3 Monitoring OSD's storage devices
3.3.4 Web-based Status Page
3.3.5 DIR Service Monitoring
3.3.6 Monitoring Services with SNMP
3.3.7 Monitoring with Ganglia
3.4 Troubleshooting
4 XtreemFS Client
4.1 Installation
4.1.1 Prerequisites
4.1.2 Installing from Pre-Packaged Releases
4.1.3 Installing from Sources
4.2 Volume Management
4.2.1 Creating Volumes
4.2.2 Deleting Volumes
4.2.3 Listing all Volumes
4.3 Accessing Volumes
4.3.1 Mounting and Un-mounting
4.3.2 Mount Options
4.3.3 /etc/fstab Integration
4.3.4 Asynchronous Writes Support
4.3.5 Object Cache
4.4 Troubleshooting
5 XtreemFS Tools
5.1 Installation
5.1.1 Prerequisites
5.1.2 Installing from Pre-Packaged Releases
5.1.3 Installing from Sources
5.2 Admin Tools
5.2.1 MRC Database Backups and Conversion
5.2.2 Scrubbing and Cleanup
5.2.3 Setting the OSD Status
5.2.4 Draining OSDs
5.3 User Tools
5.3.1 xtfsutil for Files
5.3.2 xtfsutil for Volumes
5.3.3 Changing OSD and Replica Selection Policies
5.3.4 Setting and Listing Policy Attributes
5.3.5 Modifying Access Control Lists
5.3.6 Snapshots
5.4 Test Tools
6 Replication
6.1 Read/Write File Replication
6.1.1 Technical Details
6.1.2 Limitations
6.1.3 Setup
6.2 Read-Only File Replication
6.2.1 Limitations
6.2.2 Setup
6.3 MRC and DIR Replication
6.3.1 Technical Details
6.3.2 Setup
7 Policies
7.1 Authentication Policies
7.1.1 UNIX uid/gid - NullAuthProvider
7.1.2 Plain SSL Certificates - SimpleX509AuthProvider
7.2 Authorization Policies
7.3 OSD and Replica Selection Policies
7.3.1 Attributes
7.3.2 Predefined Policies
7.3.3 OSD Selection based on Custom Attributes
7.3.4 Vivaldi
7.4 Striping Policies
7.5 Plug-in Policies
A Support
B Hadoop Integration
B.1 Introduction
B.2 Quick Start
C Client Library libxtreemfs
C.1 General Interface
C.2 Using the C++ libxtreemfs
C.3 Using the libxtreemfs for Java
D Command Line Utilities
Index
Changes
Summary of important changes in release 1.5.1:
- Improved Hadoop support
Hadoop Adapter supports Hadoop-2.x and other applications running on the
YARN platform.
- Consistent adding and removing replicas for R/W replication
Replica consistency is ensured while adding and removing replicas,
xtfs_scrub can replace failed replicas automatically.
- Improved SSL mode
The used SSL/TLS version is selectable, strict certificate chain checks
are possible, the SSL code on client and server side was improved.
- Better support for mounting XtreemFS using /etc/fstab
All mount parameters can be passed to the client by mount.xtreemfs -o
option=value.
- Initial version of an LD_PRELOAD based client
The client comes in the form of a library that can be linked to an
application via LD_PRELOAD. File system calls to XtreemFS are directly
forwarded to the services without FUSE. The client is intended for systems
without FUSE or performance critical applications (experimental).
- The size of a volume can be limited
Added quota support on volume level. The capacity limits are currently
checked while opening a file on the MRC.
- Minor bugfixes and improvements across all components.
See the CHANGELOG for more details and references to the issue numbers.
- OSD health monitoring
OSDs can report their health, e.g. determined by SMART values to the DIR.
The results are aggregated in the DIR web interface. The default OSD
selection policy can skip unhealthy OSDs.
Summary of important changes in release 1.5:
- Improved Hadoop support
Added support for multiple volumes and read and write buffer to speed up performance. See section B.1.
- SSDs support
Support for multiple OSD storage threads to increase parallelism. See section 3.2.6.
- Replication Status Page
Status webpage as part of the DIR webinterface for replicated files to show current primary and backup replicas.
- Multi-Homing Support
XtreemFS can now be made available for multiple networks and clients will pick the correct address automatically. See option .
- Multiple OSDs per Machine
Support for multiple OSDs per machine (e.g. one for each disk) through the xtreemfs-osd-farm init.d script. See section 3.3.2.
- Improved Checksum Support
xtfs_scrub now repairs replicas with an invalid checksum automatically.
- Major bugfixes for Read/Write and Read-Only Replication
There were problems with the fail-over of replicas which were fixed.
- Minor bugfixes and improvements across all components.
See the CHANGELOG for more details and references to the issue numbers.
Summary of important changes in release 1.4:
- Improved Stability
Fixed client crashes when timeouts occurred. Fixed server crashes and issues with the R/W replication.
- Full support for asynchronous writes
If enabled, write() requests will be immediately acknowledged by the client and executed in the background. Outstanding writes are always flushed at close() or fsync*() events. This improves the write throughput, especially in case of connections with high latency. See section 4.3.4 for more information.
- Windows Client (Beta)
Rewrite of Windows Client (based on C++ libxtreemfs) which uses Eldos' Callback File System product instead of Dokan.
- Re-wrote HDFS interface implementation
Use XtreemFS as replacement for HDFS in your Hadoop setup. See section B.1 how to use it.
- libxtreemfs for Java
Access XtreemFS directly from your Java application. See section C.3 how to use it.
- Re-added and improved Vivaldi support
Vivaldi is directly integrated in the client now and there's a visualization of the coordinates available, even of the client coordinates. See section 7.3.4.
- Support for custom attributes in the OSD Selection policies
Added support for OSD Selection based on Custom Attributes e.g., assign a country code to every OSD as custom attribute and limit the placement of files on OSDs based on the attribute (see 7.3.3).
Summary of important changes in release 1.3:
- new client
We have re-written the client from scratch. The new client supports automatic fail-over for replicated files and metadata caching.
- libxtreemfs
libxtreemfs is a convenient C++ library to use XtreemFS directly without a mounted client or the VFS layer. The new client is built on top of this library. A java version of libxtreemfs is planned.
- File system snapshots
XtreemFS now supports snapshots. A snapshot reflects a momentary state of a volume or directory. It can be mounted and read-only accessed.
- Full file replication
Starting with this release, XtreemFS supports full file replication. Read/write replicated files offer regular file system semantics and work with all applications.
- DIR, MRC replication
The DIR and MRC can now be replicated using the BabuDB database replication. The replication works with a primary and backups. If the primary fails, a backup will automatically take over after a short time.
- xtfsutil
We have replaced all user tools with a single binary. The new tool doesn't require java anymore.
- OSD drain
With OSD drain, files can be removed from an OSD without interrupting the system. A fully drained OSD can be removed from the system without data loss.
Summary of important changes in release 1.2.1:
- server status
Each server (especially OSDs) have a persistent status which can be online or dead/removed. This status must be changed manually and is used by the scrubber tool to identify dead OSDs which have been removed from the system.
- enhanced scrubber
The scrubber is now able to remove replicas which are stored on OSDs that are marked as dead/removed. The scrubber will create new replicas for that file if a complete replica still exists and a sufficient number of OSDs is available. In addition, the scrubber marks replicas as "complete" if they contain all objects of the original file.
This is a summary of the most important changes in release 1.2:
- renamed binaries
We renamed most binaries to conform with Linux naming conventions, e.g. xtfs_mount is now mount.xtreemfs. However, we added links with the old names for compatibility. For a full list see Sec. D.
- "Grid SSL" mode
In this mode, SSL is only used for authentication (handshake) and regular TCP is used for communication afterwards. For more details see Sec. 3.2.5.
- the xctl utility
The new release includes a command line utility xctl for starting and stopping the services. This tool is useful if you don't want a package based installation or if you don't have root privileges.
- vivaldi
XtreemFS now includes modules for calculating Vivaldi network coordinates to reflect the latency between OSDs and clients. An OSD and replica selection policy for vivaldi is also available. For details, see Sec. 7.3.4.
Chapter 1
Quick Start
This is the very short version to help you set up a local installation of XtreemFS.
- Download XtreemFS RPMs/DEBs and install
- Download the RPMs or DEBs for your system from the XtreemFS website (http://www.xtreemfs.org)
- open a root console (su or sudo)
- install with rpm -Uhv xtreemfs*-1.3.x.rpm
- Start the Directory Service:
/etc/init.d/xtreemfs-dir start
- Start the Metadata Server:
/etc/init.d/xtreemfs-mrc start
- Start the OSD:
/etc/init.d/xtreemfs-osd start
- If not already loaded, load the FUSE kernel module:
modprobe fuse
- Depending on your distribution, you may have to add users to a special group to allow them to mount FUSE file systems. In openSUSE users must be in the group trusted, in Ubuntu in the group fuse. You may need to log out and log in again for the new group membership to become effective.
- You can now close the root console and work as a regular user.
- Wait a few seconds for the services to register at the directory service. You can check the registry by opening the DIR status page in your favorite web browser http://localhost:30638.
- Create a new volume with the default settings:
mkfs.xtreemfs localhost/myVolume
- Create a mount point:
mkdir ~/xtreemfs
- Mount XtreemFS on your computer:
mount.xtreemfs localhost/myVolume ~/xtreemfs
- Have fun ;-)
- To un-mount XtreemFS:
umount.xtreemfs ~/xtreemfs
You can also mount this volume on remote computers. First make sure that the ports 32636, 32638 and 32640 are open for incoming TCP connections. You must also specify a hostname that can be resolved by the remote machine! This hostname has to be used instead of localhost when mounting.
Chapter 2
About XtreemFS
Since you decided to take a look at this user guide, you probably read or heard about XtreemFS and want to find out more. This chapter contains basic information about the characteristics and the architecture of XtreemFS.
2.1 What is XtreemFS?
XtreemFS is a file system for a variety of different use cases and purposes. Since it is impossible to categorize or explain XtreemFS in a single sentence, we introduce XtreemFS by means of its two most significant properties: XtreemFS is a globally distributed and replicated file system.
What makes XtreemFS a distributed file system? We consider a file system as distributed if files are stored across a number of servers rather than a single server or local machine. Unlike local or network file systems, a distributed file system aggregates the capacity of multiple servers. As a globally distributed file system, XtreemFS servers may be dispersed all over the world. The capacity can be increased and decreased by adding and removing servers, but from a user's perspective, the file system appears to reside on a single machine.
What makes XtreemFS a replicated file system? We call it a replicated file system because replication is one of its most prominent features. XtreemFS is capable of maintaining replicas of files on different servers. Thus, files remain accessible even if single servers, hard disks or network connections fail. Besides, replication yields benefits in terms of data rates and access times. Different replicas of a file can be accessed simultaneously on different servers, which may lead to a better performance compared to simultaneous accesses on a single server. By placing file replicas close the consuming users and applications in a globally distributed installation, the effects of network latency and bandwidth reduction in wide area networks can be mitigated. However, replication is transparent to users and applications that work with XtreemFS; the file system is capable of controlling the life cycle and access of replicas without the need for human intervention or modifications of existing applications.
2.2 Is XtreemFS suitable for me?
If you consider using XtreemFS, you may be a system administrator in search of a better and more flexible alternative to your current data management solution. Or you may be a private user in need of a file system that can be easily set up and accessed from any machine in the world. You might also be someone looking for an open-source solution to manage large amounts of data distributed across multiple sites. In any case, you will wonder if XtreemFS fulfills your requirements. As a basis for your decision, the following two paragraphs point out the characteristics of XtreemFS.
XtreemFS is ...
... an open source file system. It is distributed freely and can be used by anyone without limitations.
... a POSIX file system. Users can mount and access XtreemFS like any other common file system. Application can access XtreemFS via the standard file system interface, i.e. without having to be rebuilt against a specialized API. XtreemFS supports a POSIX-compliant access control model.
... a multi-platform file system. Server and client modules can be installed and run on different platforms, including most Linux distributions, Solaris, Mac OS X and Windows.
... a globally distributed file system. Unlike cluster file systems, an XtreemFS installation is not restricted to a single administrative domain or cluster. It can span the globe and may comprise servers in different administrative domains.
... a failure-tolerant file system. As stated in the previous section, replication can keep the system alive and the data safe. In this respect, XtreemFS differs from most other open-source file systems.
... a secure file system. To ensure security in an untrusted, worldwide network, all network traffic can be encrypted with SSL connections, and users can be authenticated with X.509 certificates.
... a customizable file system. Since XtreemFS can be used in different environments, we consider it necessary to give administrators the possibility of adapting XtreemFS to the specific needs of their users. Customizable policies make it possible change the behavior of XtreemFS in terms of authentication, access control, striping, replica placement, replica selection and others. Such policies can be selected from a set of predefined policies, or implemented by administrators and plugged in the system.
XtreemFS is not ...
... a high-performance cluster file system. Even though XtreemFS reaches acceptable throughput rates on a local cluster, it cannot compete with specialized cluster file systems in terms of raw performance numbers. Most such file systems have an optimized network stack and protocols, and a substantially larger development team. If you have huge amounts of data on a local cluster with little requirements but high throughput rates to them, a cluster file system is probably the better alternative.
... a replacement for a local file system. Even though XtreemFS can be set up and mounted on a single machine, the additional software stack degrades the performance, which makes XtreemFS a bad alternative.
2.3 Core Features
The core functionality of XtreemFS is characterized by a small set of features, which are explained in the following.
Distribution.
An XtreemFS installation comprises multiple servers that may run on different nodes connected on a local cluster or via the Internet. Provided that the servers are reachable, a client module installed on any machine in the world can access the installation. A binary communication protocol based on Google's Protocol Buffers ensures an efficient communication with little overhead between clients and servers. XtreemFS ensures that the file system remains in a consistent state even if multiple clients access a common set of files and directories. Similar to NFS, it offers a close-to-open consistency model in the event of concurrent file accesses.
Replication.
Starting with release 1.3, XtreemFS supports the replication of mutable files as well as a replicated Directory Service (DIR) and Metadata Catalog (MRC). All components in XtreemFS can be replicated for redundancy which results in a fully fault-tolerant file system. The replication in XtreemFS works with hot backups, which automatically take over if the primary replica fails.
Since version 1.0, XtreemFS supports read-only replication. A file may have multiple replicas, provided that the it was explicitly made read-only before, which means that its content cannot be changed anymore. This kind of replication can be used to make write-once files available to many consumers, or to protect them from losses due to hardware failures. Besides complete replicas that are immediately synchronized after having been created, XtreemFS also supports partial replicas that are only filled with content on demand. They can e.g. be used to make large files accessible to many clients, of which only parts need to be accessed.
Striping.
To ensure acceptable I/O throughput rates when accessing large files, XtreemFS supports striping. A striped file is split into multiple chunks ("stripes"), which are stored on different storage servers. Since different stripes can be accessed in parallel, the whole file can be read or written with the aggregated network and storage bandwidth of multiple servers. XtreemFS currently supports the RAID0 striping pattern, which splits a file up in a set of stripes of a fixed size, and distributes them across a set of storage servers in a round-robin fashion. The size of an individual stripe as well as the number of storage servers used can be configured on a per-file or per-directory basis.
Security.
To enforce security, XtreemFS offers mechanisms for user authentication and authorization, as well as the possibility to encrypt network traffic.
Authentication describes the process of verifying a user's or client's identity. By default, authentication in XtreemFS is based on local user names and depends on the trustworthiness of clients and networks. In case a more secure solution is needed, X.509 certificates can be used.
Authorization describes the process of checking user permissions to execute an operation. XtreemFS supports the standard UNIX permission model, which allows for assigning individual access rights to file owners, owning groups and other users.
Authentication and authorization are policy-based, which means that different models and mechanisms can be used to authenticate and authorize users. Besides, the policies are pluggable, i.e. they can be freely defined and easily extended.
XtreemFS uses unauthenticated and unencrypted TCP connections by default. To encrypt all network traffic, services and clients can establish SSL connections. However, using SSL requires that all users and services have valid X.509 certificates.
2.4 Architecture
XtreemFS implements an object-based file system architecture (Fig. 2.1): file content is split into a series of fixed-size objects and stored across storage servers, while metadata is stored on a separate metadata server. The metadata server organizes file system metadata as a set of volumes, each of which implements a separate file system namespace in the form of a directory tree.
In contrast to block-based file systems, the management of available and used storage space is offloaded from the metadata server to the storage servers. Rather than inode lists with block addresses, file metadata contains lists of storage servers responsible for the objects, together with striping policies that define how to translate between byte offsets and object IDs. This implies that object sizes may vary from file to file.
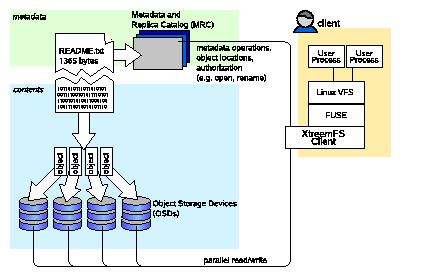
Figure 2.1: The XtreemFS architecture and components.
XtreemFS Components.
An XtreemFS installation contains three types of servers that can run on one or several machines (Fig. 2.1):
- DIR - Directory Service
The directory service is the central registry for all services in XtreemFS. The MRC uses it to discover storage servers.
- MRC - Metadata and Replica Catalog
The MRC stores the directory tree and file metadata such as file name, size or modification time. Moreover, the MRC authenticates users and authorizes access to files.
- OSD - Object Storage Device
An OSD stores arbitrary objects of files; clients read and write file data on OSDs.
These servers are connected by the client to a file system. A client mounts one of the volumes of the MRC in a local directory. It translates file system calls into RPCs sent to the respective servers.
The client is implemented as a FUSE user-level driver that runs as a normal process. FUSE itself is a kernel-userland hybrid that connects the user-land driver to Linux' Virtual File System (VFS) layer where file system drivers usually live.
Chapter 3
XtreemFS Services
This chapter describes how to install and set up the server side of an XtreemFS installation.
3.1 Installation
When installing XtreemFS server components, you can choose from two different installation sources: you can download one of the pre-packaged releases that we create for most Linux distributions or you can install directly from the source tarball.
Note that the source tarball contains the complete distribution of XtreemFS, which also includes client and tools. Currently, binary distributions of the server are only available for Linux.
3.1.1 Prerequisites
For the pre-packaged release, you will need Sun Java JRE 1.6.0 or newer to be installed on the system.
When building XtreemFS directly from the source, you need a Sun Java JDK 1.6.0 or newer, Ant 1.6.5 or newer and gmake.
3.1.2 Installing from Pre-Packaged Releases
On RPM-based distributions (RedHat, Fedora, SuSE, Mandriva) you can install the package with
$> rpm -i xtreemfs-server-1.3.x.rpm xtreemfs-backend-1.3.x.rpm
For Debian-based distributions, please use the .deb package provided and install it with
$> dpkg -i xtreemfs-server-1.3.x.deb xtreemfs-backend-1.3.x.deb
To install the server components, the following package is required: jre ≥ 1.6.0 for RPM-based releases, java6-runtime for Debian-based releases. If you already have a different distribution of Java6 on your system, you can alternatively install the XtreemFS server packages as follows:
$> rpm -i --nodeps xtreemfs-server-1.3.x.rpm \
   xtreemfs-backend-1.3.x.rpm
on RPM-based distributions,
$> dpkg -i --ignore-depends java6-runtime \
   xtreemfs-server-1.3.x.deb xtreemfs-backend-1.3.x.deb
on Debian-based distributions.
To ensure that your local Java6 installation is used, is necessary to set the JAVA_HOME environment variable to your Java6 installation directory, e.g.
$> export JAVA_HOME=/usr/java6
Both RPM and Debian-based packages will install three init.d scripts to start up the services (xtreemfs-dir, xtreemfs-mrc, xtreemfs-osd). If you want the services to be started automatically when booting up the system, you can execute insserv <init.d script> (SuSE), chkconfig --add <init.d script> (Mandriva, RedHat) or update-rc.d <init.d script> defaults (Ubuntu, Debian).
3.1.3 Installing from Sources
Extract the tarball with the sources. Change to the top level directory and execute
$> make server
This will build the XtreemFS server and Java-based tools. When done, execute
$> sudo make install-server
to install the server components. Finally, you will be asked to execute a post-installation script
$> sudo /etc/xos/xtreemfs/postinstall_setup.sh
to complete the installation.
3.2 Configuration
After having installed the XtreemFS server components, it is recommendable to configure the different services. This section describes the different configuration options.
XtreemFS services are configured via Java properties files that can be modified with a normal text editor. Default configuration files for a Directory Service, MRC and OSD are located in /etc/xos/xtreemfs/.
3.2.1 A Word about UUIDs
XtreemFS uses UUIDs (Universally Unique Identifiers) to be able to identify services and their associated state independently from the machine they are installed on. This implies that you cannot change the UUID of an MRC or OSD after it has been used for the first time!
The Directory Service resolves UUIDs to service endpoints, where each service endpoint consists of an IP address or hostname and port number. Each endpoint is associated with a netmask that indicates the subnet in which the mapping is valid. If is enabled, multiple endpoints with different netmasks are assigned to a single UUID. In addition one default mapping, which is valid in all networks with the netmask "*", will be assigned. By default this will be the first available network device with a public address.
Changes to the IP address, hostname or port are possible at any time, but have to be propagated to the Directory Service by a . Due to the caching of UUIDs in all components, it can take some time until the new UUID mapping is used by all OSDs, MRCs and clients. The TTL (time-to-live) of a mapping defines how long an XtreemFS component is allowed to keep entries cached. The default value is 3600 seconds (1 hour). It should be set to shorter durations if services change their IP address frequently.
To create a globally unique UUID you can use tools like uuidgen. During installation, the post-install script will automatically create a UUID for each OSD and MRC if it does not have a UUID assigned.
3.2.2 Configuration for mixed IPv4 / IPv6 networks and NATs
XtreemFS is IPv6 ready, but requires a hostname based configuration for mixed networks due to the way UUIDs are resolved. If no hostname is configured, the default endpoint will be set to the first available network device with a public address. If this is an IPv6 address, clients or services in IPv4 networks won't be able to access the service with the resolved UUID. Additional IPv4 endpoints may be available, but will be bound to a specific netmask.
To enable mixed networks each service has to be configured with a , which is resolvable to the IPv4 address as well as to the IPv6 address by clients and other services. This can be achieved by using the Domain Name System and setting the A and AAAA records for each hostname.
Analogous problems occur in systems with NAT (network address translation) like on Amazon Virtual Private Cloud or OpenStack. By default each service will register its local address which is unreachable from other networks. To enable services with NAT you can add the external address to the internal network device with a corresponding route and use the DNS to resolve hostnames as described above. To ensure services from the same network are using a direct route it is advised to enable .
3.2.3 Automatic DIR Discovery
OSDs and MRCs are capable of automatically discovering a Directory Service. If automatic DIR discovery is switched on, the service will broadcast requests to the local LAN and wait up to 10s for a response from a DIR. The services will select the first DIR which responded, which can lead to non-deterministic behavior if multiple DIR services are present. Note that the feature works only in a local LAN environment, as broadcast messages are not routed to other networks. Local firewalls on the computers on which the services are running can also prevent the automatic discovery from working.
Security: The automatic discovery is a potential security risk when used in untrusted environments as any user can start-up DIR services.
A statically configured DIR address and port can be used to disable DIR discovery in the OSD and MRC (see Sec. 3.2.7, dir_service). By default. the DIR responds to UDP broadcasts. To disable this feature, set discover = false in the DIR service config file.
3.2.4 Authentication
Administrators may choose the way of authenticating users in XtreemFS. Authentication Providers are pluggable modules that determine how users are authenticated. For further details, see Sec. 7.1.
To set the authentication provider, it is necessary to set the following property in the MRC configuration file:
authentication_provider = <classname>
By default, the following class names can be used:
- org.xtreemfs.common.auth.NullAuthProvider
uses local user and group IDs
- org.xtreemfs.common.auth.SimpleX509AuthProvider
uses X.509 certificates; user and group IDs are extracted from the distinguished names of the certificates
3.2.5 Configuring SSL Support
In order to enable certificate-based authentication in an XtreemFS installation, services need to be equipped with X.509 certificates. Certificates are used to establish a mutual trust relationship among XtreemFS services and between the XtreemFS client and XtreemFS services.
Note that it is not possible to mix SSL-enabled and non-SSL services in an XtreemFS installation! If you only need authentication based on certificates without SSL, you can use the "grid SSL" mode. In this mode XtreemFS will only do an SSL handshake and fall back to plain TCP for communication. This mode is insecure (not encrypted and records are not signed) but just as fast as the non-SSL mode. If this mode is enabled, all client tools must be used with the pbrpcg:// scheme prefix.
Each XtreemFS service needs a certificate and a private key in order to be run. Once they have been created and signed, the credentials may need to be converted into the correct file format. XtreemFS services also need a trust store that contains all trusted Certification Authority certificates.
By default, certificates and credentials for XtreemFS services are stored in
/etc/xos/xtreemfs/truststore/certs
Converting PEM files to PKCS#12
The simplest way to provide the credentials to the services is by converting your signed certificate and private key into a PKCS#12 file using openssl:
$> openssl pkcs12 -export -in ds.pem -inkey ds.key \
   -out ds.p12 -name "DS"
$> openssl pkcs12 -export -in mrc.pem -inkey mrc.key \
   -out mrc.p12 -name "MRC"
$> openssl pkcs12 -export -in osd.pem -inkey osd.key \
   -out osd.p12 -name "OSD"
This will create three PKCS12 files (ds.p12, mrc.p12 and osd.p12), each containing the private key and certificate for the respective service. The passwords chosen when asked must be set as a property in the corresponding service configuration file.
Importing trusted certificates from PEM into a JKS
The certificate (or multiple certificates) from your CA (or CAs) can be imported into a Java Keystore (JKS) using the Java keytool which comes with the Java JDK or JRE.
Execute the following steps for each CA certificate using the same keystore file.
$> keytool -import -alias rootca -keystore trusted.jks \
   -trustcacerts -file ca-cert.pem
This will create a new Java Keystore trusted.jks with the CA certificate in the current working directory. The password chosen when asked must be set as a property in the service configuration files.
Note: If you get the following error
keytool error: java.lang.Exception: Input not an X.509 certificate
you should remove any text from the beginning of the certificate (until the --BEGIN CERTIFICATE-- line).
Sample Setup
Users can easily set up their own CA (certificate authority) and create and sign certificates using openssl for a test setup.
- Set up your test CA.
- Create a directory for your CA files
$> mkdir ca
- Create a private key and certificate request for your CA.
		$> openssl req -new -newkey rsa:1024 -nodes -out ca/ca.csr \
		   -keyout ca/ca.key
Enter something like XtreemFS-DEMO-CA as the common name (or something else, but make sure the name is different from the server and client name!).
- Create a self-signed certificate for your CA which is valid for one year.
		$> openssl x509 -trustout -signkey ca/ca.key -days 365 -req \
		   -in ca/ca.csr -out ca/ca.pem
- Create a file with the CA's serial number
$> echo "02" > ca/ca.srl
- Set up the certificates for the services and the XtreemFS Client.
Replace SERVICE with dir, mrc, osd and client.
- Create a private key for the service.
Use XtreemFS-DEMO-SERVICE as the common name for the certificate.
$> openssl req -new -newkey rsa:1024 -nodes \
   -out SERVICE.req \
   -keyout SERVICE.key
- Sign the certificate with your demo CA.
The certificate is valid for one year.
$> openssl x509 -CA ca/ca.pem -CAkey ca/ca.key \
   -CAserial ca/ca.srl -req \
   -in SERVICE.req \
   -out SERVICE.pem -days 365
- Export the service credentials (certificate and private key) as a PKCS#12 file.
For the dir, mrc and osd services, use "passphrase" as export password.
$> openssl pkcs12 -export -in SERVICE.pem -inkey SERVICE.key \
   -out SERVICE.p12 -name "SERVICE"
For the XtreemFS Client, leave the export password empty to avoid being asked for the password on mount. If you do not want to/cannot distribute the demo CA to the clients' trusted root CA paths (e.g. on Linux machines), also include your demo CA in the PKCS#12 file so the server certificates can be verified.
$> openssl pkcs12 -export -in client.pem -inkey client.key \
   -out client_ca.p12 -name "client_ca" -certfile ca.pem
Multiple CA's certificates (e.g. for using a certificate chain) can be specified by concatenating them and storing them in a new file which can then be used as argument to the -certfile option.
- Copy the PKCS#12 file to the certificates directory.
$> mkdir -p /etc/xos/xtreemfs/truststore/certs
$> cp SERVICE.p12 /etc/xos/xtreemfs/truststore/certs
- Export your CA's certificate to the trust store and copy it to the certificate dir.
You should answer "yes" when asked "Trust this certificate".
Use "jks_passphrase" as passphrase for the keystore.
	$> keytool -import -alias ca -keystore trusted.jks \
	   -trustcacerts -file ca/ca.pem
	$> cp  trusted.jks /etc/xos/xtreemfs/truststore/certs
It is sufficient to only trust the CA's certificates which have signed the other services' (and clients') certificates, instead of trusting the entire chain. For example, if you signed MRC.pem with ca.pem, which in turn was signed with some_ca.pem, you do not need to import some_ca.pem into the keystore.
- Configure the services.
Edit the configuration file for all your services. Set the following configuration options (see Sec. 3.2 for details).
ssl.enabled = true
ssl.service_creds.pw = passphrase
ssl.service_creds.container = pkcs12
ssl.service_creds = /etc/xos/xtreemfs/truststore/certs/service.p12
ssl.trusted_certs = /etc/xos/xtreemfs/truststore/certs/trusted.jks
ssl.trusted_certs.pw = jks_passphrase
ssl.trusted_certs.container = jks
- Start up the XtreemFS services (see Sec. 3.3.1).
- Create a new volume (see Sec. 4.2.1 for details).
Use
	$> mkfs.xtreemfs --pkcs12-file-path=\
	   /etc/xos/xtreemfs/truststore/certs/client_ca.p12 pbrpcs://localhost/test
for SSL-enabled servers, or
	$> mkfs.xtreemfs --pkcs12-file-path=\
	   /etc/xos/xtreemfs/truststore/certs/client_ca.p12 pbrpcg://localhost/test
for Grid-SSL-enabled servers.
- Mount the volume (see Sec. 4.3 for details).
Use
	$> mount.xtreemfs --pkcs12-file-path=\
	   /etc/xos/xtreemfs/truststore/certs/client_ca.p12 pbrpcs://localhost/test /mnt
for SSL-enabled servers, or
	$> mount.xtreemfs --pkcs12-file-path=\
	   /etc/xos/xtreemfs/truststore/certs/client_ca.p12 pbrpcg://localhost/test /mnt
for Grid-SSL-enabled servers.
Setting passphrases in command line tools
There are two options to set the passhrase for the trusted certificates and the keystore in command line tools.
- Set the passphrase with the corresponding parameter (See the man page of the corresponding tool). For example:
	$> mount.xtreemfs --pkcs12-file-path=\
	   /etc/xos/xtreemfs/truststore/certs/client.p12 \
	   --pkcs12-passphrase=passphrase pbrpcs://localhost/test /mnt
or
	$> xtfs_chstatus \
	   -c /etc/xos/xtreemfs/truststore/certs/client.p12 \
	   -cpass phasphrase \
	   -t /etc/xos/xtreemfs/truststore/certs/trusted.jks \
	   -tpass jks_passpharase test-osd online
- Set the corresponding passphrase parameter to "-" and you will be prompted for the passphrase. For example:
	$> mount.xtreemfs --pkcs12-file-path=\
	   /etc/xos/xtreemfs/truststore/certs/client.p12 \
	   --pkcs12-passphrase=- pbrpcs://localhost/test /mnt
Press enter and you will be prompted for the passphrase:
No PKCS#12 certificate passphrase was given. Please enter it now:
3.2.6 Running XtreemFS on SSDs
SSDs are replacing spinning hard disk drives increasingly. This trend is also relevant for the area of distributed file systems. As XtreemFS uses an underlying local file system for all services, XtreemFS can be used with SSDs without any modifications.
To make use of the increased performance that an SSD can provide, it might be suitable to use multiple storage threads on the XtreemFS OSD. The number of storage threads can be adjusted by the storage_threads parameter in the OSD configuration file (see Sec. 3.2.7).
3.2.7 List of Configuration Options
All configuration parameters that may be used to define the behavior of the different services are listed in this section. Unless marked as optional, a parameter has to occur (exactly once) in a configuration file. Parameters marked as experimental belong to the DIR and MRC replication feature, which is currently under development. It is not recommended to mess about with these options if you want to use XtreemFS in production.
Aside from using the following predefined parameters to configure services, OSDs also allow to specify custom configuration parameters. Such parameters may have arbitrary names that start with the prefix "config.". They can be used to enable a fine-grained individual assignment of OSDs to new files and replicas. For further details, please refer to Section 7.3.3.
admin_password optional
| Services | DIR, MRC, OSD |
| Values | String |
| Default | |
| Description | Defines the admin password that must be sent to authorize requests like volume creation, deletion or shutdown. The same password is also used to access the HTTP status page of the service (user name is admin).
|
authentication_provider
| Services | MRC |
| Values | Java class name |
| Default | org.xtreemfs.common.auth.NullAuthProvider |
| Description | Defines the Authentication Provider to use to retrieve the user identity (user ID and group IDs). See Sec. 3.2.4 for details.
|
babudb.baseDir
| Services | DIR, MRC |
| Values | absolute file system path to a directory |
| Default | DIR: /var/lib/xtreemfs/dir/database |
| MRC: /var/lib/xtreemfs/mrc/database |
| Description | The directory in which the Directory Service or MRC will store their databases. This directory should never be on the same partition as any OSD data, if both services reside on the same machine. Otherwise, deadlocks may occur if the partition runs out of free disk space.
|
babudb.cfgFile optional
| Services | DIR, MRC |
| Values | a file name |
| Default | DIR: config.db |
| MRC: config.db |
| Description | Name for the database configuration file.
|
babudb.checkInterval optional
| Services | DIR, MRC |
| Values | a positive integer value |
| Default | DIR: 300 |
| MRC: 300 |
| Description | The number of seconds between two checks of the disk log size for automatic checkpointing. Set this value to 0 to disable automatic checkpointing.
|
babudb.compression optional
| Services | DIR, MRC |
| Values | true or false |
| Default | DIR: false |
| MRC: false |
| Description | Flag that determines whether database content shall be compressed or not.
|
babudb.debug.level optional
| Services | DIR, MRC |
| Values | 0, 1, 2, 3, 4, 5, 6, 7 |
| Default | DIR: 4 |
| MRC: 4 |
| Description | This is the debug level for BabuDB only. The debug level determines the amount and detail of information written to logfiles. Any debug level includes log messages from lower debug levels. The following log levels exist:
0 - fatal errors
1 - alert messages
2 - critical errors
3 - normal errors
4 - warnings
5 - notices
6 - info messages
7 - debug messages
|
babudb.logDir
| Services | DIR, MRC |
| Values | absolute file system path |
| Default | DIR: /var/lib/xtreemfs/dir/db-log |
| MRC: /var/lib/xtreemfs/mrc/db-log |
| Description | The directory the MRC uses to store database logs. This directory should never be on the same partition as any OSD data, if both services reside on the same machine. Otherwise, deadlocks may occur if the partition runs out of free disk space.
|
babudb.maxLogfileSize optional
| Services | DIR, MRC |
| Values | a positive integer value |
| Default | DIR: 16777216 |
| MRC: 16777216 |
| Description | If automatic checkpointing is enabled, a checkpoint is created when the disk logfile exceeds maxLogfileSize bytes. The value should be reasonable large to keep the checkpointing-rate low. However, it should not be too large as a large disk log increases the recovery time after a crash.
|
babudb.pseudoSyncWait optional
| Services | DIR, MRC |
| Values | a positive integer value |
| Default | DIR: 200 |
| MRC: 0 |
| Description | The BabuDB disk logger can batch multiple operations into a single write+fsync to increase the throughput. This does only work if there are operations executed in parallel by the worker threads. In turn, if you work on a single database it becomes less efficient. To circumvent this problem, BabuDB offers a pseudo-sync mode which is similar to the PostgreSQL write-ahead log (WAL). If pseduoSyncWait is set to a value larger then 0, this pseudo-sync mode is enabled. In this mode, insert operations are acknowledged as soon as they have been executed on the in-memory database index. The disk logger will execute a batch write of up to 500 operations followed by a single sync (see syncMode) every pseudoSyncWait ms. This mode is considerably faster than synchronous writes but you can lose data in case of a crash. In contrast to ASYNC mode the data loss is limited to the operations executed in the last pseudoSyncWait ms.
|
babudb.sync
| Services | DIR, MRC |
| Values | ASYNC, SYNC_WRITE_METADATA, SYNC_WRITE, |
| FDATASYNC or FSYNC |
| Default | DIR: FSYNC |
| MRC: ASYNC |
| Description | The sync mode influences how operations are committed to the disk log before the operation is acknowledged to the caller.
-ASYNC mode the writes to the disk log are buffered in memory by the operating system. This is the fastest mode but will lead to data loss in case of a crash, kernel panic or power failure.
-SYNC_WRITE_METADATA opens the file with O_SYNC, the system will not buffer any writes. The operation will be acknowledged when data has been safely written to disk. This mode is slow but offers maximum data safety. However, BabuDB cannot influence the disk drive caches, this depends on the OS and hard disk model.
-SYNC_WRITE similar to SYNC_WRITE_METADATA but opens file with O_DSYNC which means that only the data is commit to disk. This can lead to some data loss depending on the implementation of the underlying file system. Linux does not implement this mode.
-FDATASYNC is similar to SYNC_WRITE but opens the file in asynchronous mode and calls fdatasync() after writing the data to disk.
-FSYNC is similar to SYNC_WRITE_METADATA but opens the file in asynchronous mode and calls fsync() after writing the data to disk.
For best throughput use ASYNC, for maximum data safety use FSYNC.
|
babudb.worker.maxQueueLength optional
| Services | DIR, MRC |
| Values | a positive integer value |
| Default | DIR: 250 |
| MRC: 250 |
| Description | If set to a value larger than 0, this is the maximum number of requests which can be in a worker's queue. This value should be used if you have pseudo-synchronous mode enabled to ensure that your queues don't grow until you get an out of memory exception. Can be set to 0 if pseudo-sync mode is disabled.
|
babudb.worker.numThreads optional
| Services | DIR, MRC |
| Values | a positiv integer value |
| Default | DIR: 0 |
| MRC: 0 |
| Description | The number of worker threads to be used for database operations. As BabuDB does not use locking, each database is handled by only one worker thread. If there are more databases than worker threads, the databases are distributed onto the available threads. The number of threads should be set to a value smaller than the number of available cores to reduce overhead through context switches. You can also set the number of worker threads to 0. This will considerably reduce latency, but may also decrease throughput on a multi-core system with more than one database.
|
capability_secret
| Services | MRC, OSD |
| Values | String |
| Default | |
| Description | Defines a shared secret between the MRC and all OSDs. The secret is used by the MRC to sign capabilities, i.e. security tokens for data access at OSDs. In turn, an OSD uses the secret to verify that the capability has been issued by the MRC.
|
capability_timeout optional
| Services | MRC |
| Values | seconds |
| Default | 600 |
| Description | Defines the relative time span for which a capability is valid after having been issued.
|
checksums.enabled
| Services | OSD |
| Values | true, false |
| Default | false |
| Description | If set to true, the OSD will calculate and store checksums for newly created objects. Each time a checksummed object is read, the checksum will be verified.
|
checksums.algorithm
| Services | OSD |
| Values | Adler32, CRC32 |
| Default | Adler32 |
| Description | Must be specified if checksums.enabled is enabled. This property defines the algorithm used to create OSD checksums.
|
debug.level optional
| Services | DIR, MRC, OSD |
| Values | 0, 1, 2, 3, 4, 5, 6, 7 |
| Default | 6 |
| Description | The debug level determines the amount and detail of information written to logfiles. Any debug level includes log messages from lower debug levels. The following log levels exist:
0 - fatal errors
1 - alert messages
2 - critical errors
3 - normal errors
4 - warnings
5 - notices
6 - info messages
7 - debug messages
|
debug.categories optional
| Services | DIR, MRC, OSD |
| Values | all, lifecycle, net, auth, stage, proc, db, misc |
| Default | all |
| Description | Debug categories determine the domains for which log messages will be printed. By default, there are no domain restrictions, i.e. log messages form all domains will be included in the log. The following categories can be selected:
all - no restrictions on the category
lifecycle - service lifecycle-related messages, including startup and shutdown events
net - messages pertaining to network traffic and communication between services
auth - authentication and authorization-related messages
stage - messages pertaining to the flow of requests through the different stages of a service
proc - messages about the processing of requests
db - messages that are logged in connection with database accesses
misc - any other log messages that do not fit in one of the previous categories
Note that it is possible to specify multiple categories by means of a comma or space-separated list.
|
dir_service.host
| Services | MRC, OSD |
| Values | hostname or IP address |
| Default | localhost |
| Description | Specifies the hostname or IP address of the directory service (DIR) at which the MRC or OSD should register. The MRC also uses this Directory Service to find OSDs. If set to .autodiscover the service will use the automatic DIR discovery mechanism (see Sec. 3.2.3). (Note that the initial `.' is used to avoid ambiguities with hosts called "autodiscover".)
|
dir_service.port
| Services | MRC, OSD |
| Values | 1 .. 65535 |
| Default | 32638 |
| Description | Specifies the port on which the remote directory service is listening. Must be identical to the listen_port in your directory service configuration.
|
discover optional
| Services | DIR |
| Values | true, false |
| Default | true |
| Description | If set to true the DIR will received UDP broadcasts and advertise itself in response to XtreemFS components using the DIR automatic discovery mechanism. If set to false, the DIR will ignore all UDP traffic. For details see Sec. 3.2.3.
|
flease.dmax_ms optional
| Services | OSD |
| Values | milliseconds |
| Default | 1000 |
| Description | Maximum clock drift between any two clocks in the system. If the actual drift between two server clocks exceeds this value, read-write replication may lead to inconsistent replicas. Since servers automatically synchronize their clocks with the clock on the DIR, however, the default 1000ms should be enough in most cases.
|
flease.lease_timeout_ms optional
| Services | OSD, MRC |
| Values | milliseconds |
| Default | 14000 |
| Description | Duration of a lease in milliseconds. For read-write-replicated files, the lease timeout specifies the validity time span of a master lease. Shorter lease timeouts guarantee a shorter fail-over period in the event of a server crash, which however comes at the cost of an increased rate of lease negotiations for each open file. The lease timeout should be set to a value at least three times flease.message_to_ms.
|
flease.message_to_ms optional
| Services | OSD |
| Values | milliseconds |
| Default | 500 |
| Description | Time to wait for responses from other OSDs when negotiating leases for replicated files. This value should be larger than the maximum message round-trip time via TCP between any pair of OSDs.
|
flease.retries optional
| Services | OSD |
| Values | 1..1000 |
| Default | 3 |
| Description | Number of times to retry acquiring a lease for a replicated file before an IO error is sent to the client.
|
geographic_coordinates optional
| Services | DIR, MRC, OSD |
| Values | String |
| Default | |
| Description | Specifies the geographic coordinates which are registered with the directory service. Used e.g. by the web console.
|
hostname optional
| Services | MRC, OSD |
| Values | String |
| Default | |
| Description | If specified and multihoming.enabled is false, it defines the host name that is used to register the service at the directory service. If neither hostname nor listen.address are specified, the service itself will search for an externally reachable network interface and advertise its address. To use multiple interfaces see .
|
health_script optional
| Services | OSD |
| Values | String |
| Default | |
| Description | If specified, the OSD will use this script to determine the health status of the storage devices which stores the object_dir. See section 3.3.2 for more information.
|
http_port
| Services | DIR, MRC, OSD |
| Values | 1 .. 65535 |
| Default | 30636 (MRC), 30638 (DIR), 30640 (OSD) |
| Description | Specifies the listen port for the HTTP service that returns the status page.
|
ignore_capabilities optional
| Services | OSD |
| Values | true, false |
| Default | false |
| Description | When set to true, capability checks on the OSD are disabled. This property should only be set to true for debugging purposes, as it effectively overrides any security mechanisms on the system.
|
listen.address optional
| Services | DIR, MRC, OSD |
| Values | IP address |
| Default | |
| Description | If specified, it defines the interface to listen on. If not specified, the service will listen on all interfaces (any).
|
listen.port
| Services | DIR, MRC, OSD |
| Values | 1 .. 65535 |
| Default | DIR: 32638, |
| MRC: 32636, |
| OSD: 32640 |
| Description | The port to listen on for incoming connections (TCP). The OSD uses the specified port for both TCP and UDP. Please make sure to configure your firewall to allow incoming TCP traffic (plus UDP traffic, in case of an OSD) on the specified port.
|
local_clock_renewal
| Services | MRC, OSD |
| Values | milliseconds |
| Default | 0 |
| Description | Reading the system clock is a slow operation on some systems (e.g. Linux) as it is a system call. To increase performance, XtreemFS services use a local variable which is only updated every local_clock_renewal milliseconds. As of XtreemFS 1.4, this optimization is disabled.
|
max_client_queue
| Services | OSD |
| Values | 1 .. N |
| Default | 100 |
| Description | To avoid overloading the server by a single client, the maximum number of pending requests per client is limited. Usually, this limit should not be exceeded unless you use Read/Write file replication in connection with asynchronous writes and a large number of allowed pending writes on the client side (see section 4.3.4).
|
monitoring.enabled
| Services | DIR |
| Values | true, false |
| Default | false |
| Description | Enables the built-in monitoring tool in the directory service. If enabled, the DIR will send alerts via emails if services are crashed (i.e. do not send heartbeat messages). No alerts will be sent for services which signed-off at the DIR. To enable monitoring you also need to configure monitoring.email.receiver, monitoring.email.program. In addition, you may want to change the values for monitoring.email.sender, monitoring.max_warnings, monitoring.service_timeout_s.
|
monitoring.email.programm
| Services | DIR |
| Values | path |
| Default | /usr/sbin/sendmail |
| Description | Location of the sendmail binary to be used for sending alert mails. See monitoring parameters.
|
monitoring.email.receiver
| Services | DIR |
| Values | email address |
| Default | - |
| Description | Email address of recipient of alert emails. See monitoring parameters.
|
monitoring.email.sender
| Services | DIR |
| Values | email address |
| Default | "XtreemFS DIR service <dir@localhost>" |
| Description | Email address and sender name to use for sending alert mails. See monitoring parameters.
|
monitoring.max_warnings
| Services | DIR |
| Values | 0..N |
| Default | 1 |
| Description | Number of alert mails to send for a single service which has crashed/disconnected. Each alert mail contains a summary of all crashed/disconnected services. See monitoring parameters.
|
monitoring.service_timeout_s
| Services | DIR |
| Values | 0..N seconds |
| Default | 300 |
| Description | Time to wait for a heartbeat message before sending an alert email. See monitoring parameters.
|
multihoming.enabled optional
| Services | MRC, OSD |
| Values | true, false |
| Default | false |
| Description | If set to true, the service will use every interface installed in the system and propagate their addresses to the DIR. If hostname is set, its address will be used as the default endpoint that should be reachable from any network. Otherwise the service tries to discover the hostname itself. |
| If this parameter is true, then listen.address must not be set.
|
multihoming.renewal_signal optional
| Services | MRC, OSD |
| Values | true, false |
| Default | false |
| Description | If set to true, the service will try to register a signal handler for USR2 upon which it refreshes its address mapping. Since some Java Virtual Machines (JVM) are using USR2 internally by default, this parameter should be used together with the JVM flag -XX:+UseAltSigs. |
| This functionality is helpful, if dynamic networks are added or removed to the system and the XtreemFS server should update its list of reachable networks.
|
no_atime
| Services | MRC |
| Values | true, false |
| Default | true |
| Description | The POSIX standard defines that the atime (timestamp of last file access) is updated each time a file is opened, even for read. This means that there is a write to the database and hard disk on the MRC each time a file is read. To reduce the load, many file systems (e.g. ext3) including XtreemFS can be configured to skip those updates for performance. It is strongly suggested to disable atime updates by setting this parameter to true.
|
object_dir
| Services | OSD |
| Values | absolute file system path to a directory |
| Default | /var/lib/xtreemfs/osd/ |
| Description | The directory in which the OSD stores the objects. This directory should never be on the same partition as any DIR or MRC database, if both services reside on the same machine. Otherwise, deadlocks may occur if the partition runs out of free disk space!
|
osd_check_interval
| Services | MRC |
| Values | seconds |
| Default | 300 |
| Description | The MRC regularly asks the directory service for suitable OSDs to store files on (see OSD Selection Policy, Sec. 7.3). This parameter defines the interval between two updates of the list of suitable OSDs.
|
policy_dir optional
| Services | MRC, OSD, DIR |
| Values | absolute file system path to a directory |
| Default | |
| Description | Directory containing user-defined policies and modules. When starting a service, the policy directory will be searched for custom policies. For further details on pluggable policies, see chapter 7.
|
remote_time_sync
| Services | MRC, OSD |
| Values | milliseconds |
| Default | 30,000 |
| Description | MRCs and OSDs all synchronize their clocks with the directory service to ensure a loose clock synchronization of all services. This is required for leases to work correctly. This parameter defines the interval in milliseconds between time updates from the directory service.
|
renew_to_caps optional
| Services | MRC |
| Values | true, false |
| Default | false |
| Description | If set to true, the MRC allows capabilities to be renewed after they timed out. This parameter should only be used for debugging purposes, as it effectively overrides the revocation of access rights on a file.
|
report_free_space
| Services | OSD |
| Values | true, false |
| Default | true |
| Description | If set to true, the OSD will report its free space to the directory service. Otherwise, it will report zero, which will cause the OSD not to be used by the OSD Selection Policies (see Sec. 7.3).
|
socket.send_buffer_size optional
| Services | OSD |
| Values | size in bytes |
| Default | -1 |
| Description | The send buffer size in bytes for sockets. -1 indicates that the default value (typically 128k) is used.
|
snmp.enabled optional
| Services | DIR, MRC, OSD |
| Values | String, either true or false |
| Default | false |
| Description | Must be set if the SNMP agent of XtreemFS should be used for monitoring. See section 3.3.6.
|
snmp.address optional
| Services | DIR, MRC, OSD |
| Values | IP address or hostname |
| Default | localhost |
| Description | If specified, it defines the interface for the SNMP agent to listen on. If not specified, the SNMP agent will listen on all interfaces (any). See section 3.3.6.
|
snmp.port optional
| Services | DIR, MRC, OSD |
| Values | 1 .. 65535 |
| Default | 34636 (MRC), 34638 (DIR), 34640 (OSD) |
| Description | Specifies the listen port for the SNMP agent. See section 3.3.6.
|
snmp.aclfile optional
| Services | DIR, MRC, OSD |
| Values | path to file |
| Default | /etc/xtreemfs/snmp.acl |
| Description | Specifies the path to the ACL file for SNMP access. See section 3.3.6.
|
ssl.enabled
| Services | DIR, MRC, OSD |
| Values | true, false |
| Default | false |
| Description | If set to true, the service will use SSL to authenticate and encrypt connections. The service will not accept non-SSL connections if ssl.enabled is set to true.
|
ssl.grid_ssl
| Services | DIR, MRC, OSD |
| Values | true, false |
| Default | false |
| Description | In this mode the services and client will only use SSL for mutual authentication with X.509 certificates (SSL handshake). After successful authentication the communication is via plain TCP. This means that there is no encryption and signing of records! This mode is comparable to HTTP connections with Digest authentication. It should be used when certificate based authentication is required but performance is more important than security, which is usually true in GRID installations. If this mode is enabled, all client tools must be used with the pbrpcg:// scheme prefix.
|
ssl.service_creds
| Services | DIR, MRC, OSD |
| Values | path to file |
| Default | DIR: /etc/xos/xtreemfs/truststore/certs/ds.p12, |
| MRC: /etc/xos/xtreemfs/truststore/certs/mrc.p12, |
| OSD: /etc/xos/xtreemfs/truststore/certs/osd.p12 |
| Description | Must be specified if ssl.enabled is enabled. Specifies the file containing the service credentials (X.509 certificate and private key). PKCS#12 and JKS format can be used, set ssl.service_creds.container accordingly. This file is used during the SSL handshake to authenticate the service.
|
ssl.service_creds.container
| Services | DIR, MRC, OSD |
| Values | pkcs12 or JKS |
| Default | pkcs12 |
| Description | Must be specified if ssl.enabled is enabled. Specifies the file format of the ssl.service_creds file.
|
ssl.service_creds.pw
| Services | DIR, MRC, OSD |
| Values | String |
| Default | |
| Description | Must be specified if ssl.enabled is enabled. Specifies the password which protects the credentials file ssl.service_creds.
|
ssl.trusted_certs
| Services | DIR, MRC, OSD |
| Values | path to file |
| Default | /etc/xos/xtreemfs/truststore/certs/xosrootca.jks |
| Description | Must be specified if ssl.enabled is enabled. Specifies the file containing the trusted root certificates (e.g. CA certificates) used to authenticate clients.
|
ssl.trusted_certs.container
| Services | DIR, MRC, OSD |
| Values | pkcs12 or JKS |
| Default | JKS |
| Description | Must be specified if ssl.enabled is enabled. Specifies the file format of the ssl.trusted_certs file.
|
ssl.trust_manager optional
| Services | DIR, MRC, OSD |
| Values | Java class name |
| Default | |
| Description | Sets a custom trust manager class for SSL connections. The trust manager is responsible for checking certificates when SSL connections are established.
|
ssl.trusted_certs.pw
| Services | DIR, MRC, OSD |
| Values | String |
| Default | |
| Description | Must be specified if ssl.enabled is enabled. Specifies the password which protects the trusted certificates file ssl.trusted_certs.
|
startup.wait_for_dir
| Services | MRC, OSD |
| Values | 0..N seconds |
| Default | 30 |
| Description | Time to wait for the DIR to become available during start up of the MRC and OSD. If the DIR does not respond within this time the MRC or OSD will abort startup.
|
storage_layout optional
| Services | OSD |
| Values | HashStorageLayout |
| Default | HashStorageLayout |
| Description | Adjusts the internally used storage layout on the OSD. The storage layout determines how an OSD stores its files and objects. Currently, only HashStorageLayout is supported.
|
storage_threads optional
| Services | OSD |
| Values | 1..N |
| Default | 1 |
| Description | Set the number of threads that are used to access the underlying file system. For spinning disks, the default value is recommended. For SSDs a higher number might be sufficient.
|
uuid
| Services | MRC, OSD |
| Values | String, but limited to alphanumeric characters, - and . |
| Default | |
| Description | Must be set to a unique identifier, preferably a UUID according to RFC 4122. UUIDs can be generated with uuidgen. Example: eacb6bab-f444-4ebf-a06a-3f72d7465e40.
|
vivaldi.max_clients
| Services | DIR |
| Values | 0..N |
| Default | 32 |
| Description | Set the maximum number of client coordinates to be remembered. 0 deactivates the client visualization (but clients might still try).
|
vivaldi.client_timeout
| Services | DIR |
| Values | 1..N milliseconds |
| Default | 600000 |
| Description | Set a timeout (in ms) after which a client's data set will be removed. This value should be set with respect to the recalculation interval of the Vivaldi algorithm set on the client.
|
vivaldi.recalculation_interval_ms
| Services | OSD |
| Values | 1..N milliseconds |
| Default | 300000 |
| Description | The time between two recalculations of the Vivaldi coordinates is randomly chosen as vivaldi.recalculation_interval_ms +/- vivaldi.recalculation_epsilon_ms.
|
vivaldi.recalculation_epsilon_ms
| Services | OSD |
| Values | 1..N milliseconds |
| Default | 30000 |
| Description | See vivaldi.recalculation_interval_ms.
|
vivaldi.iterations_before_updating
| Services | OSD |
| Values | 1..N |
| Default | 12 |
| Description | The number of Vivaldi iterations before a new list of peers (OSDs) will be fetched from the DIR.
|
vivaldi.max_retries_for_a_request
| Services | OSD |
| Values | 1..N |
| Default | 2 |
| Description | Number of retries before accepting a 'suspiciously high' RTT.
|
vivaldi.max_request_timeout_ms
| Services | OSD |
| Values | 1..N milliseconds |
| Default | 10000 |
| Description | Maximum number of milliseconds an OSD waits for a response before discarding its corresponding request (expiration times smaller than vivaldi.timer_interval_ms are not granted).
|
vivaldi.timer_interval_ms
| Services | OSD |
| Values | 1..N milliseconds |
| Default | 600000 |
| Description | Period of time between two Vivaldi probes.
|
3.3 Execution and Monitoring
This section describes how to execute and monitor XtreemFS services.
3.3.1 Starting and Stopping the XtreemFS services
If you installed a pre-packaged release you can start, stop and restart the services with the init.d scripts:
	$> /etc/init.d/xtreemfs-dir start
	$> /etc/init.d/xtreemfs-mrc start
	$> /etc/init.d/xtreemfs-osd start
or
	$> /etc/init.d/xtreemfs-dir stop
	$> /etc/init.d/xtreemfs-mrc stop
	$> /etc/init.d/xtreemfs-osd stop
To run init.d scripts, root permissions are required. Note that MRC and OSD will wait for the Directory Service to become available before they start up. Once a Directory Service as well as at least one OSD and MRC are running, XtreemFS is operational.
3.3.2 Running multiple OSDs per Machine
Running more than one OSD service per host might be useful in various situations. Use cases for this might be machines with more than one disk as an alternative to a local RAID or testing purposes. We offer an extended init.d script, named xtreemfs-osd-farm, to start or stop a set of OSDs on one host by a single script.
The xtreemfs-osd-farm script can be found in the /usr/share/xtreemfs directory, if XtreemFS is installed by the provided packages, or in the contrib directory of the XtreemFS GIT repository.
Using the xtreemfs-osd-farm script demands two steps. First, a list names for all of the used OSDs hat to be set to the OSD_INSTANCES variable in the script. The list elements have to be separated by spaces. In the second step, a configuration file with the name <osdname>.config.properties has to be created in /etc/xos/xtreemfs for all of the defined OSD names, whereas <osdname> has to be replaced by the particular OSD name. After these steps, the init.d script can be executed with the usual arguments start, stop, status, restart, and try-restart. A single OSD can be controlled by xtreemfs-osd-farm <osdname> <argument>.
3.3.3 Monitoring OSD's storage devices
The health status of OSDs storage devices (e.g. the SMART health test of the
used disks) can be used to determine if an OSD will fail soon or is actually
failed. If the health status is available, the default OSD selection policy
(id 1000) can use it to exclude OSDs with a critical status (WARNING or
FAILED). To test the health status, the OSD executes a user-defined script, that
can be configured in the OSD configuration file with the health_check
parameter. If you want to write such a script you must consider the following
things:
- The script will be executed with the object_dir as the first
(and only) parameter
- The script must exit with one of the following return values:
- 0 - PASSED: Storage device is in an uncritical state. The OSD
is not filtered out when the default OSD selection policy is used.
- 1 - WARNING: Storage could be in an critical state soon. The OSD
is filtered out, depending on the osd_health_status attribute, if the
default OSD selection policy is used.
- 2 - FAILED: Storage device is in an critical state. The OSD is
filtered out when the default OSD selection policy is used.
- 3 - Not Available: The health status is not available. Also used
when an error occurs or an invalid value is returned from the script.
- Additionally, the output of the script (stdout) is send to the DIR and is
shown in the web interface
An example script for Linux systems is provided in
/usr/share/xtreemfs/osd_health_check.sh. This script uses the SMART
health test result of the devices which stores the object_dir. The
Script supports software RAID configurations (/dev/md*) and single
devices(/dev/sd* or /dev/hd*). In order to use this script,
smartmontools must be installed and the command smartctl must
be executable with sudo privileges without password.
3.3.4 Web-based Status Page
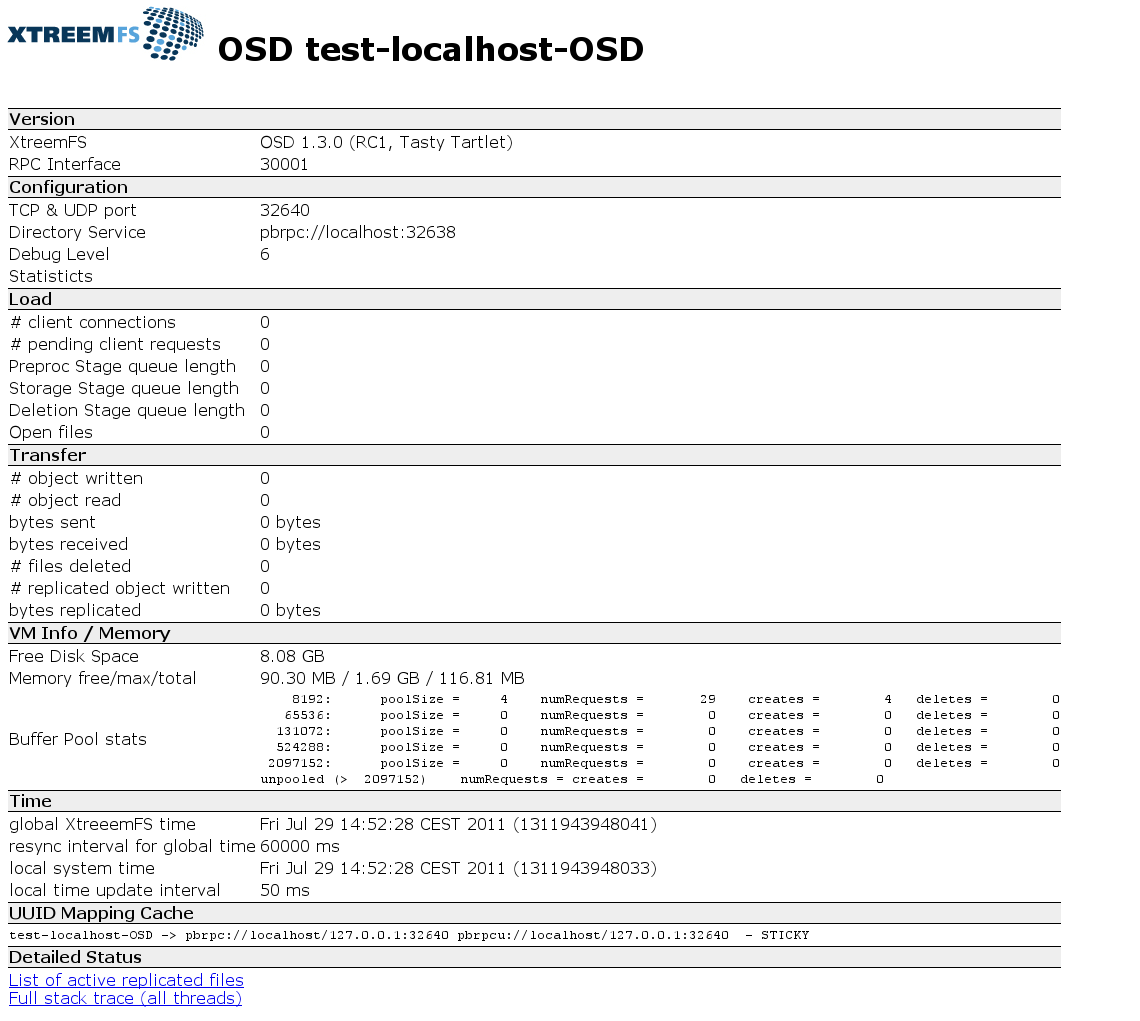
Figure 3.1: OSD status web page
Each XtreemFS service can generate an HTML status page, which displays runtime information about the service (Fig. 3.1). The HTTP server that generates the status page runs on the port defined by the configuration property http_port; default values are 30636 for MRCs, 30638 for Directory Services, and 30640 for OSDs.
The status page of an MRC can e.g. be shown by opening
http://my-mrc-host.com:30636/
with a common web browser. If you set an admin password in the service's configuration, you will be asked for authentication when accessing the status page. Use admin as user name.
3.3.5 DIR Service Monitoring
The directory service has a built-in notification system that can send alert emails if a service fails to send heartbeat messages for some time. The monitoring can be enabled in the DIR configuration by setting monitoring = true.
3.3.6 Monitoring Services with SNMP
All XtreemFS services can act as SNMP agent which gives the possibility to monitor status information through the SNMP protocol. To enable SNMP support for a specific service you have to set the following parameter in its configuration file:
snmp.enabled = true
snmp.address = localhost
snmp.port = 34638
snmp.aclfile =  /etc/xos/xtreemfs/snmp.acl
If snmp.enabled is not set to true the service will not start a SNMP agent and all other SNMP related configuration parameter will be ignored. snmp.port defines the port on which the SNMP agent will listen and snmp.address the interface it is bound to. Since XtreemFS uses SNMPv2 which is known to be not secure it is recommended to use a dedicated monitoring network and a dedicated interface. The optional snmp.aclfile paramater is a path to JDMK1 (Java Dynamic Management Kit - the library used for providing SNMP functionality in XtreemFS) ACL file. In this file you can define who (which hosts) can use what kind of SNMP feature. Because the XtreemFS SNMP agent only provides the functionality to read values per SNMP the following example acl file is sufficient:
acl = {
 {
 communities = public
 access = read-only
 managers = localhost
 }
}
communites is the SNMP community string your managers have to use and managers is a comma-separated list of hostnames, ip addresses or subnets in prefix notation (i.e. "xtreemfs-host", "192.168.0.54" or "192.168.0.3/24").
Note: If you comment out the snmp.aclfile line every host on your network can access all information through the SNMP agent.
If you have configured SNMP correctly an easy way to check if the SNMP agent is running is by using the snmpget commandline tool as follows
$> snmpget -v2c -cpublic localhost:34638 1.3.6.1.4.1.38350.1.1.0
where "public" is the community string and the SNMP agent listens at port 9001 on localhost. "1.3.6.1.4.1.38350.1.1.0" is the OID (object identifier) which is associated with the amount of memory the JVM of this service is currently using. A list of all queryable OIDs and which information the represent can be found in the following tables.
| General: These information belong to all services |
| OID | Textual representation | Datatype | Description |
| 1.3.6.1.4.1.38350.1.1.0 | jvmUsedMemory | Long | The amount of memory that is used by the JVM this service is running into. |
| 1.3.6.1.4.1.38350.1.2.0 | jvmMaxMemory | Long | The maximum amount of memory the JVM can use. |
| 1.3.6.1.4.1.38350.1.3.0 | jvmFreeMemory | Long | The amount of free memory the JVM can still use. |
| 1.3.6.1.4.1.38350.1.4.0 | rpcInterface | Integer32 | The interface number associated with Google Protocolbuffers RPC infrastructure. |
| 1.3.6.1.4.1.38350.1.5.0 | databaseVersion | String | The version of the BabuDB Database which the service is using. |
| 1.3.6.1.4.1.38350.1.6.0 | tcpPort | Integer32 | The TCP port on which the service is listening for incomming client connections. |
| 1.3.6.1.4.1.38350.1.7.0 | debugLevel | Integer | The current Debug Level the service has. |
| 1.3.6.1.4.1.38350.1.8.0 | numClientConnections | Integer32 | Number of active client connections. |
| 1.3.6.1.4.1.38350.1.9.0 | numPendingRequests | Long | The number of currently pending requests. |
| 1.3.6.1.4.1.38350.1.10.0 | currentTime | Long | The global time in this XtreemFS installation. |
| 1.3.6.1.4.1.38350.1.11.0 | isRunning | String | Returns whether or not the service is running. (ONLINE, OFFLINE) |
| 1.3.6.1.4.1.38350.1.12.0 | serviceType | String | Returns which kind of service this is (DIR, MRC, OSD). |
| 1.3.6.1.4.1.38350.1.13.0 | serviceUUID | String | Returns the UUID of the service. |
| Dir: These information belong to the DIR service |
| OID | Textual representation | Datatype | Description |
| 1.3.6.1.4.1.38350.2.1.0 | addressMappingCount | Integer | The number of address mappings currently registered at the DIR. |
| 1.3.6.1.4.1.38350.2.2.0 | serviceCount | Integer | The number of services currently registered at the DIR. |
| Mrc: These information belong to the MRC service |
| OID | Textual representation | Datatype | Description |
| 1.3.6.1.4.1.38350.3.1.0 | volumeCount | Integer | The number of volumes currently registered at this MRC. |
| Osd: These information belong to the OSD service |
| OID | Textual representation | Datatype | Description |
| 1.3.6.1.4.1.38350.4.1.0 | numObjsRX | Long | The number of objects this OSD has received. |
| 1.3.6.1.4.1.38350.4.2.0 | numReplObjsRX | Long | The number of replicated objects this OSD has received. |
| 1.3.6.1.4.1.38350.4.3.0 | numObjsTX | Long | The number of objects this OSD has transmitted. |
| 1.3.6.1.4.1.38350.4.4.0 | numReplBytesRX | Long | The number of bytes belonging to file replication this OSD has received. |
| 1.3.6.1.4.1.38350.4.5.0 | numBytesRX | Long | The number of bytes this OSD has received. |
| 1.3.6.1.4.1.38350.4.6.0 | numBytesTX | Long | The number of bytes this OSD has transmitted. |
| 1.3.6.1.4.1.38350.4.7.0 | preprocStageQueueLength | Integer | The current length of the preprocessing stage of this OSD. |
| 1.3.6.1.4.1.38350.4.8.0 | storageStageQueueLength | Integer | The current length of the storage stage of this OSD. |
| 1.3.6.1.4.1.38350.4.9.0 | deletionStageQueueLength | Integer | The current length of the deletion stage of this OSD. |
| 1.3.6.1.4.1.38350.4.10.0 | numOpenFiles | Long | The number of files this OSD has currently opened. |
| 1.3.6.1.4.1.38350.4.11.0 | numDeletedFiles | Integer | The number of deleted files on this OSD. |
| 1.3.6.1.4.1.38350.4.12.0 | freeSpace | Long | The free disc space on the partition this OSD stores the object files. |
3.3.7 Monitoring with Ganglia
Ganglia2 is a monitoring system specialized for environments like clusters and grids. XtreemFS provides three python based plugins for the ganglia monitoring daemon which act as SNMP manager and gather information through a local SNMP agent.
To use these plugins you have to copy them to the /usr/lib/ganglia/python_modules/ directory on the host running your XtreemFS service and a ganglia monitoring daemon. You have to ensure that
[(i)]
- your ganglia installation supports python modules
- you installed python and the pysnmp3 library which is used by the plugins
Also you have to configure the modules with *.pyconf files in the /etc/ganglia/conf.d/ directory. I.e. to monitor a running DIR instance the following example file can be used
modules {
  module {
    name = "xtfs-dir-plugin"
    language = "python"
    param Host {
      value = localhost
    }
    param Port {
      value = 34638
    }
    param CommunityString {
      value = public
    }
  }
}

collection_group {
  collect_every = 300
  time_threshold = 100
  metric {
    name = "dir_jvm_used_mem"
    title = "used memory of the jvm"
    value_threshold = 1
  }
  metric {
    name = "dir_jvm_free_mem"
    title = "free memory of the jvm"
    value_threshold = 1
  }
  metric {
    name = "dir_client_connections"
    title = "number of Clients"
    value_threshold = 1
  }
  metric {
    name = "dir_pending_requests"
    title = "number of pending requests"
    value_threshold = 1
  }
  metric {
    name = "addr_mapping_count"
    title = "number of address mappings"
    value_threshold = 1
  }
  metric {
    name = "service_count"
    title = "number of services"
    value_threshold = 1
  }
  metric {
    name = "dir_status"
    title = "Status DIR"
  }
  metric {
    name = "dir_uuid"
    title = "DIR UUID"
  }
}
Every XtreemFS plugin has to get 3 parameters: Host, Port, CommunityString where Host is the hostname of the SNMP agent, Port the port of the agent and CommunityString the community string as it is configured in the snmp.acl file. These parameters are configured in the modules directive. The collection_group directive describes which metrics should be gathered. An overview of all possible metrics shows the gmond -m command. For most people the default configurations that came with your XtreemFS distribution should be sufficient. More information about ganglia, the ganglia monitoring daemon plugin system and how to configure plugins can be found at http://sourceforge.net/apps/trac/ganglia.
3.4 Troubleshooting
Various issues may occur when attempting to set up an XtreemFS server component. If a service fails to start, the log file often reveals useful information. Server log files are located in /var/log/xtreemfs. Note that you can restrict granularity and categories of log messages via the configuration properties debug.level and debug.categories (see Sec. 3.2.7).
If an error occurs, please check if all of the following requirements are met:
- You have root permissions when starting the service. Running the init.d scripts requires root permissions. However, the services themselves are started on behalf of a user xtreemfs.
- DIR has been started before MRC and OSD. Problems may occur if a script starts multiple services as background processes.
- There are no firewall restrictions that keep XtreemFS services from communicating with each other. The default ports that need to be open are: 32636 (MRC, TCP), 32638 (DIR, TCP), and 32640 (OSD, TCP & UDP).
- The MRC database version is correct. In case of an outdated database version, the xtfs_mrcdbtool commands of the old and new XtreemFS version can dump and restore the database, respectively (see Sec. 5.2.1).
- A network interface is available on the host. It may be either bound to an IPv4 or IPv6 address.
Chapter 4
XtreemFS Client
The XtreemFS client is needed to access an XtreemFS installation from a local or remote machine. This chapter describes how to use the XtreemFS client in order to work with XtreemFS like a local file system.
If you are interested into integrating XtreemFS directly into your application, please have a look at the description of the C++ and Java implementations of the Client library libxtreemfs in section C.
4.1 Installation
There are two different installation sources for the XtreemFS Client: pre-packaged releases and source tarballs.
Note that the source tarball contains the complete distribution of XtreemFS, which also includes server and tools. Currently, binary distributions of the client are only available for Linux and Windows.
4.1.1 Prerequisites
To install XtreemFS on Linux, please make sure that FUSE 2.6 or newer, boost 1.35 or newer, openSSL 0.9.8 or newer, libattr and a Linux 2.6 kernel are available on your system. For an optimal performance, we suggest to use FUSE 2.8 with a kernel version 2.6.26 or newer.
4.1.2 Installing from Pre-Packaged Releases
On RPM-based distributions (RedHat, Fedora, SuSE, Mandriva) you can install the package with
$> rpm -i xtreemfs-client-1.3.x.rpm
For Debian-based distributions, please use the .deb package provided and install it with
$> dpkg -i xtreemfs-client-1.3.x.deb
For Windows, please use the .msi installer that will guide you through the installation process.
For Mac OS X, we provide packaged client with installer.
4.1.3 Installing from Sources
Extract the tarball with the sources. Change to the top level directory and execute
$> make client
This will build the XtreemFS client and non-Java-based tools. Note that the following third-party packages are required on Linux:
- RPM-based distros:
cmake >= 2.6
gcc-c++ >= 4.1
fuse >= 2.6
fuse-devel >= 2.6
boost-devel >= 1.35
openssl-devel >= 0.9.8
libattr-devel >= 2
- DEB-based distros:
cmake (>= 2.6)
build-essential (>=11)
libfuse-dev (>= 2.6)
libssl-dev (>= 0.9)
libattr-dev (>= 2)
libboost-system1.35-dev or later
libboost-thread1.35-dev or later
libboost-program-options1.35-dev or later
libboost-regex1.35-dev or later
When done, execute
$> sudo make install-client
to complete the installation of XtreemFS.
4.2 Volume Management
Like many other file systems, XtreemFS supports the concept of volumes. A volume can be seen as a container for files and directories with its own policy settings, e.g. for access control and replication. Before being able to access an XtreemFS installation, at least one volume needs to be set up. This section describes how to deal with volumes in XtreemFS.
4.2.1 Creating Volumes
Volumes can be created with the mkfs.xtreemfs command line utility. Please see mkfs.xtreemfs --help or man mkfs.xtreemfs for a full list of options and usage.
When creating a volume, you can specify the authorization policy (see Sec. 7.2) with the option --access-control-policy (respectively -a). If not specified, POSIX permissions/ACLs will be chosen by default. Unlike most other policies, authorization policies cannot be changed afterwards.
In addition, it is possible to set a default striping policy (see Sec. 7.4). If no per-file or per-directory default striping policy overrides the volume's default striping policy, the volume's policy is assigned to all newly created files. If no volume policy is explicitly defined when creating a volume, a RAID0 policy with a stripe size of 128kB and a width of 1 will be used as the default policy.
A volume with the default options (POSIX permission model, a stripe size of 128 kB and a stripe width of 1 (i.e. all stripes will reside on the same OSD)) can be created as follows:
$> mkfs.xtreemfs my-mrc-host.com/myVolume
Creating a volume may require privileged access, which depends on whether an administrator password is required by the MRC. To pass an administrator password, add --admin_password <password> to the mkfs.xtreemfs command.
For a complete list of parameters, please refer to mkfs.xtreemfs --help or the man mkfs.xtreemfs man page.
4.2.2 Deleting Volumes
Volumes can be deleted with the rmfs.xtreemfs tool. Deleting a volume implies that any data, i.e. all files and directories on the volume are irrecoverably lost! Please see rmfs.xtreemfs --help or man rmfs.xtreemfs for a full list of options and usage. Please also note that rmfs.xtreemfs does not dispose of file contents on the OSD. To reclaim storage space occupied by the volume, it is therefore necessary to either remove all files from the volume before deleting it, or to run the cleanup tool (see Section 5.2.2).
The volume myVolume residing on the MRC my-mrc-host.com (listening at the default port) can e.g. be deleted as follows:
$> rmfs.xtreemfs my-mrc-host.com/myVolume
Volume deletion is restricted to volume owners and privileged users. Similar to mkfs.xtreemfs, an administrator password can be specified if required.
4.2.3 Listing all Volumes
A list of all volumes can be displayed with the lsfs.xtreemfs tool. All volumes hosted by the MRC my-mrc-host.com (listening at the default port) can be listed as follows:
$> lsfs.xtreemfs my-mrc-host.com
The listing of available volumes is restricted to volume owners and privileged users. Similar to mkfs.xtreemfs, an administrator password can be specified if required.
4.3 Accessing Volumes
Once a volume has been created, it needs to be mounted in order to be accessed.
4.3.1 Mounting and Un-mounting
Before mounting XtreemFS volumes on a Linux machine, please ensure that the FUSE kernel module is loaded. Please check your distribution's manual to see if users must be in a special group (e.g. trusted in openSuSE) to be allowed to mount FUSE file systems.
$> su
Password:
#> modprobe fuse
#> exit
Volumes are mounted with the mount.xtreemfs command:
$> mount.xtreemfs remote.dir.machine/myVolume /xtreemfs
remote.dir.machine describes the host with the Directory Service at which the volume is registered; myVolume is the name of the volume to be mounted. /xtreemfs is the directory on the local file system to which the XtreemFS volume will be mounted. For more options, please refer to mount.xtreemfs --help or man mount.xtreemfs.
Please be aware that the Directory Service URL needs to be provided when mounting a volume, while MRC URLs are used to create volumes.
When mounting a volume, the client will immediately go into background and won't display any error messages. Use the -f option to prevent the mount process from going into background and get all error messages printed to the console. Alternatively, you can execute xtfsutil --errors <mount point> to print the last 20 errors for a mounted volume.
To check that a volume is mounted, use the mount command. It outputs a list of all mounts in the system. XtreemFS volumes are listed as type fuse:
xtreemfs@localhost/xtreemfs on /xtreemfs type fuse (...)
Volumes are unmounted with the umount.xtreemfs tool:
$> umount.xtreemfs /xtreemfs
On Mac OS X, volumes are unmounted with the regular umount command:
$> umount /xtreemfs
4.3.2 Mount Options
Access to a FUSE mount is usually restricted to the user who mounted the volume. To allow the root user or any other user on the system to access the mounted volume, the FUSE options -o allow_root and -o allow_other can be used with mount.xtreemfs. They are, however, mutually exclusive. In order to use these options, the system administrator must create a FUSE configuration file /etc/fuse.conf and add a line user_allow_other.
By default, the local system cache on the client machine will be used to speed up read access to XtreemFS. In particular, using the cache as a local buffer is necessary to support the mmap system call, which - amongst others - is required to execute applications on Linux. Additionally, it enables the read-ahead functionality of Fuse and does speed up sequential reads, especially in presence of high latencies. If the local system cache is not disabled, the consistency model of client caches is limited to "close-to-open", which is similar to the model provided by NFS. Buffered I/O can be switched off by adding the -o direct_io parameter. The parameter effects that all read and write operations are directed to their OSDs instead of being served from local caches. Enabling -o direct_io might be also necessary if you rely on interruption support of read requests in Linux. Please see issue 229 for more details.
All mount options and their description can be viewed in detail when running:
$> mount.xtreemfs --help
All options (except -o) can be specified explicitly or via the -o option, i.e.
$> mount.xtreemfs demo.xtreemfs.org/demo /mnt/xtreemfs \
     --log-level DEBUG -l /tmp/xtreemfs.log
is equivalent to
$> mount.xtreemfs demo.xtreemfs.org/demo /mnt/xtreemfs \
     -o log-level=DEBUG,-l=/tmp/xtreemfs.log
Note that when using -o, short options are still prefixed with a dash and the equal sign is mandatory. Options specified via -o that are not XtreemFS options are passed to FUSE as described above. Options specified via -o are ignored if they are also specified explicitly, i.e.
$> mount.xtreemfs demo.xtreemfs.org/demo /mnt/xtreemfs \
     -o log-level=DEBUG --log-level=INFO
has the same effect as
$> mount.xtreemfs demo.xtreemfs.org/ demo /mnt/xtreemfs \
     --log-level=INFO
4.3.3 /etc/fstab Integration
By allowing all options to be specified using -o (see section 4.3.2), an integration for automatic mounting using /etc/fstab on Unix and Unix-like systems is possible (note that /etc/fstab may have different names or be located somewhere else depending on the Unix version). Simply append lines like the following to /etc/fstab and modify as needed:
[commandchars=
{}]
# <file system> <mount point> <type> <options> <dump> <pass>
demo.xtreemfs.org:32638/demo /mnt/xtreemfs xtreemfs
\hookrightarrow\space defaults,_netdev,-d=INFO,log-file-path=/tmp/xtreemfs.log 0 0
defaults is a shorthand for rw,suid,dev,exec,auto,nouser,async. This will result in the following command:
$> /sbin/mount.xtreemfs demo.xtreemfs.org:32638/demo /mnt/xtreemfs \
  -o rw,_netdev,-d=INFO,log-file-path=/tmp/xtreemfs.log
rw is passed on to Fuse, _netdev is ignored by XtreemFS (however it is used by mount, see below) and the other options are processed as usual. Note that this requires that you have properly installed the client (see section 3.1).
/etc/fstab is read on system startup or when executing
$> mount -a
When mounting at system startup, it is vital to specify the _netdev option to defer device mounting until the network has been started on the system. Otherwise the system will hang on boot.
4.3.4 Asynchronous Writes Support
By default, all file system operations are synchronous i.e., they will block until a response was received. This will result in a low throughput, especially when reading or writing data over high latency links, because the pause where the client waits for a response remains unused. For reading data, this is mitigated by the read-ahead functionality of FUSE. For writing data, we added support for asynchronous writes i.e., the client will acknowledge a write() command to the application before it received the response from the OSD. This behavior is similar to that of local file systems which also acknowledge written data while they write it to disk in the background. Effectively, this allows to pipeline requests and reach the maximum throughput of the system (assuming buffer sizes are chosen high enough). If asynchronous writes are enabled, the client will wait for pending write()s if the file handle is closed or flushed by the application.
Asynchronous writes can be enabled with the command line option --enable-async-writes. The asynchronous writes buffer of each open file is limited by two factors:
- Maximum number of pending requests. This can be configured with the option --async-writes-max-reqs. Do not set this value above 100 or increase the OSD configuration parameter max_client_queue accordingly.
- Maximum buffer size. The buffer size is determined as product of the number of pending requests and the assumed maximum request size. On Linux, the assumed maximum request size is set to 128 kB i.e., the default buffer size on Linux is 1280 kB (10 * 128 kB). If you like, you can change the assumed maximum request size with the hidden client option --async-writes-max-reqsize-kb. However, note that FUSE on Linux does not support write() requests larger than 128 kB.
If one of these limits is reached, subsequent write() requests will block.
4.3.5 Object Cache
The client supports a per-file write-back object cache with LRU policy. This cache is enabled with --object-cache-size=<N> where N is the maximum number of objects it may cache. The cache is currently mutually exclusive with async. writes.
The cache is still experimental and therefore disabled by default.
4.4 Troubleshooting
Different kinds of problems may occur when trying to create, mount or access files in a volume. By default errors are logged to the console. Once mount.xtreemfs moved into background, use xtfsutil --errors <mount point> to print the last 20 errors for a mounted volume. Additionally, the tools mkfs.xtreemfs, rmfs.xtreemfs, lsfs.xtreemfs and mount.xtreemfs allow to log error messages to a logfile which has to be specified by the -l option. Use the -d option to specify the minimum severity of to be logged events.
For quickly identifying problems and testing, we recommend to run the client mount.xtreemfs in the foreground (option -f) and increase the debugging level (option -d). This can be done as follows:
$> mount.xtreemfs -f -d DEBUG remote.dir.machine/myVolume /xtreemfs
The following list contains the most common problems and their solutions.
| Problem | A volume cannot be created or mounted. |
| Solution | Please check your firewall settings on the server side. Are all ports accessible? The default ports are 32636 (MRC), 32638 (DIR), and 32640 (OSD).
In case the XtreemFS installation has been set up behind a NAT, it is possible that services registered their NAT-internal network interfaces at the DIR. In this case, clients cannot properly resolve server addresses, even if port forwarding is enabled. Please check the Address Mappings section on the DIR status page to ensure that externally reachable network interfaces have been registered for the your servers' UUIDs. If this is not the case, it is possible to explicitly specify the network interfaces to register via the hostname property (see Sec. 3.2.7).
|
| Problem | An error occurs when trying to access a mounted volume. |
| Solution | Please make sure that you have sufficient access rights to the volume root. Superusers and volume owners can change these rights via chmod <mode> <mountpoint>. If you try to access a mount point to which XtreemFS was mounted by a different user, please make sure that the volume is mounted with mount.xtreemfs -o allow_other ....
|
| Problem | An I/O error occurs when trying to create new files. |
| Solution | In general, you can check the output of xtfsutil --errors <mount point> to see the error which caused the I/O error. A common reason for this problem is that no OSD could be assigned to the new file. Please check if suitable OSDs are available for the volume. There are two alternative ways to do this:
- Execute xtfsutil <mountpoint>.
- Open the MRC status page. It can be accessed via http://<MRC-host>:30636 in the default case. For each volume, a list of suitable OSDs is shown there.
There may be different reasons for missing suitable OSDs:
- One or more OSDs failed to start up. Please check the log files and status pages of all OSDs to ensure that they are running.
- One or more OSDs failed to register or regularly report activity at the DIR. Please check the DIR status page to ensure that all OSDs are registered and active.
- There are no OSDs with a sufficient amount of free disk space. Please check the OSD status page to obtain information about free disk space.
|
| Problem | An I/O error occurs when trying to access an existing file. |
| Solution | Please check whether all OSDs assigned to the file are running and reachable. This can be done as follows:
- Get the list of all OSDs for the file: xtfsutil <file>.
- Check whether the OSDs in (one of) all replicas in the list are running and reachable, e.g. by opening the status pages or via telnet <host> <port>.
|
Chapter 5
XtreemFS Tools
To make use of most of the advanced XtreemFS features, XtreemFS offers a variety of tools. There are tools that support administrators with the maintenance of an XtreemFS installation, as well as tools for controlling features like replication and striping. An overview of the different tools with descriptions of how to use them are provided in the following.
5.1 Installation
The user tools are built, packaged and installed together with the XtreemFS client. For details on how to install the XtreemFS client, please refer to Section 4.1.
To install XtreemFS admin tools, you can choose from two different installation sources: you can download one of the pre-packaged releases that we create for most Linux distributions or you can install directly from the source tarball.
Note that the source tarball contains the complete distribution of XtreemFS, which also includes client and server. Currently, binary distributions of the admin tools are only available for Linux.
5.1.1 Prerequisites
For the pre-packaged release, you will need Sun Java JRE 1.6.0 or newer to be installed on the system. Some tools also require the attr/libattr package to be installed.
When building XtreemFS directly from the source, you need a Sun Java JDK 1.6.0 or newer, Ant 1.6.5 or newer and gmake.
5.1.2 Installing from Pre-Packaged Releases
On RPM-based distributions (RedHat, Fedora, SuSE, Mandriva) you can install the package with
$> rpm -i xtreemfs-tools-1.3.x.rpm xtreemfs-backend-1.3.x.rpm
For Debian-based distributions, please use the .deb package provided and install it with
$> dpkg -i xtreemfs-tools-1.3.x.deb xtreemfs-backend-1.3.x.deb
To install the tools, the following package is required: jre ≥ 1.6.0 for RPM-based releases, java6-runtime for Debian-based releases. If you already have a different distribution of Java6 on your system, you can alternatively install the XtreemFS tools packages as follows:
$> rpm -i --nodeps xtreemfs-tools-1.3.x.rpm \
   xtreemfs-backend-1.3.x.rpm
on RPM-based distributions,
$> dpkg -i --ignore-depends java6-runtime \
   xtreemfs-tools-1.3.x.deb xtreemfs-backend-1.3.x.deb
on Debian-based distributions.
To ensure that your local Java6 installation is used, is necessary to set the JAVA_HOME environment variable to your Java6 installation directory, e.g.
$> export JAVA_HOME=/usr/java6
All XtreemFS tools will be installed to /usr/bin.
5.1.3 Installing from Sources
Extract the tarball with the sources. Change to the top level directory and execute
$> make server
When done, execute
$> sudo make install-tools
to complete the installation. Note that this will also install the XtreemFS client and servers.
5.2 Admin Tools
This section describes the tools that support administrators in maintaining an XtreemFS installation.
5.2.1 MRC Database Backups and Conversion
The database format in which the MRC stores its file system metadata on disk may change with future XtreemFS versions, even though we attempt to keep it as stable as possible. To ensure that XtreemFS server components may be updated without having to create and restore a backup of the entire installation, it is possible to convert an MRC database to a newer version by means of a version-independent XML representation.
This is done as follows:
- Create an XML representation of the old database with the old MRC version.
- Update the MRC to the new version.
- Restore the database from the XML representation.
xtfs_mrcdbtool is a tool that is capable of doing this. It can create an XML dump of an MRC database as follows:
$> xtfs_mrcdbtool -mrc pbrpc://my-mrc-host.com:32636 \
   dump /tmp/dump.xml
A file dump.xml containing the entire database content of the MRC running on my-mrc-host.com:32636 is written to /tmp/dump.xml. For security reasons, the dump file will be created locally on the MRC host. To make sure that sufficient write permissions are granted to create the dump file, we therefore recommend to specify an absolute dump file path like /tmp/dump.xml.
A database dump can be restored from a dump file as follows:
$> xtfs_mrcdbtool -mrc pbrpc://my-mrc-host.com:32636 \
   restore /tmp/dump.xml
This will restore the database stored in /tmp/dump.xml at my-mrc-host.com. Note that for safety reasons, it is only possible to restore a database from a dump if the database of the running MRC does not have any content. To restore an MRC database, it is thus necessary to delete all MRC database files before starting the MRC.
Please be aware that dumping and restoring databases may both require privileged access rights if the MRC requires an administrator password. The password can be specified via --admin_password; for further details, check the xtfs_mrcdbtool man page.
5.2.2 Scrubbing and Cleanup
In real-world environments, errors occur in the course of creating, modifying or deleting files. This can cause corruptions of file data or metadata. Such things happen e.g., if the client is suddenly terminated, or loses connection with a server component. There are several such scenarios: if a client writes to a file but does not report file sizes received from the OSD back to the MRC, inconsistencies between the file size stored in the MRC and the actual size of all objects in the OSD will occur. If a client deletes a file from the directory tree, but cannot reach the OSD, orphaned objects will remain on the OSD. If an OSD is terminated during an ongoing write operation, file content will become corrupted.
Besides, if files are replicated, it is essential to ensure that all replicas remain accessible in the long term. Unless all of a file's replicas are checked periodically, it may happen that they silently become unavailable over time, thus making the file unavailable despite having multiple replicas.
In order to fix inconsistencies and to restore lost replicas of files, tools for scrubbing and OSD cleanup exist. To check the consistency of file sizes and checksums, the following command can be executed:
$> xtfs_scrub -dir pbrpc://my-dir-host.com:32638 -repair myVolume
This will scrub each file in the volume myVolume and attempt to correct any error if necessary. Scrubbing a file takes the following steps:
- ensure that the file size stored with the metadata reflects the actual file size on the OSD(s),
- check whether an invalid checksum in the OSD indicates a corrupted file content,
- check if one or more read-only replicated replicas are on an OSD marked as "removed" (which can be done with the xtfs_chstatus tool) and restore the desired numbers of replicas by adding new replicas, if necessary
The -dir argument specifies the directory service that will be used to resolve service UUIDs. The -repair argument ensures that errors are corrected; without this argument, they are only detected. Please see man xtfs_scrub for further details.
A second tool scans an OSD for orphaned objects. It can be used as follows:
$> xtfs_cleanup -dir pbrpc://localhost:32638 \
   uuid:u2i3-28isu2-iwuv29-isjd83
The given UUID identifies the OSD to clean and will be resolved by the
directory service defined by the -dir option (localhost:32638 in this example).
The process will be started and can be stopped by setting the option
-stop. To watch the cleanup progress use option -i for the
interactive mode. For further information see man xtfs_cleanup.
The cleanup tool is also responsible for the deletion of orhpaned metadata. Metadata can
not be deleted instantly because some information (particularly the XLocSets' version) is
required to preserve consistency, even if the file has been deleted or a replica has been
removed. Metadata must be retained until it is assured, that every client has a consistent
view on the set of participating replicas. By default metadata is deleted after 600 seconds,
which is equal to the time span a capability is valid.
5.2.3 Setting the OSD Status
The OSD's status field is shown in the service status page as static.status. The status can be online (new files be assigned to it), locked (new files will not be assigned to it) and removed (replicas assigned to this OSD will be replaced). Status online is the regular status for all services, even if they are temporarily offline. Status removed marks an OSD as permanently failed and the scrubber will removed replicas and files from these OSDs. Status locked will effectively set an OSD to "read-only" since no new files are placed on it.
The status can be set with the xtfs_chstatus tool:
$> xtfs_chstatus -dir pbrpc://localhost:32638 \
   u2i3-28isu2-iwuv29-isjd83 online
This command sets the status of the OSD with the UUID u2i3-28isu2-iwuv29-isjd83 to online.
5.2.4 Draining OSDs
In some cases, it may be necessary to remove an OSD from an XtreemFS installation. The OSD drain tool removes an OSD without losing the files stored on it. This is done by distributing the files across the remaining OSDs before performing the removal. The tool can be used as follows:
$> xtfs_remove_osd -dir localhost:32638 \
   uuid:8bca70da-c963-43c7-b30b-d0d605d39fa7
Executing the command will drain the OSD with the given UUID that was registered at the given DIR. A drained OSD will not be assigned to new files. By default, it will remain in the system until it is manually shut down by the administrator. To perform an automatic shutdown, use the -s switch. Please refer to the man page for further details.
How it Works
Draining an OSD works as follows:
- The OSD is marked as "locked". This restrains it from being assigned to newly created files.
- A new replica is added to each file stored on the OSD. The OSD used for this replica is selected according to the volume's OSD selection policy (see Section 7.3).
- Once the new replica has become consistent, i.e. all content has been copied from the original replica, the original replica (which is stored on the OSD that is supposed to be drained) is removed.
- As soon as all replicas have been removed, the draining procedure has finished.
Limitations
While the draining is in progress, it is not possible to modify the to be moved files as they are temporarily set to read-only. Additionally, when the draining will be started, no files of the OSD should be hold open by any client.
Draining an OSD that holds striped and replicated files involves certain limitations. A striped file is currently moved to a new OSD in its entirety rather than partially. Regardless of the original number of OSDs it was striped across, it is relocated to a single target OSD, which implies that the target file is not striped anymore. As a consequence, data may be moved from OSDs that are not directly affected by the draining process.
Furthermore, at least one OSD has to exist for each file that does not hold any data of the file, i.e. is not included in any stripe or replica. If all OSDs that are eligible according to the OSD selection policy have already been assigned to a file, draining any of these OSDs will fail, as no additional replicas can be created.
5.3 User Tools
Since release 1.3, all user tools have been replaced by the xtfsutil tool. xtfsutil displays XtreemFS specific file and directory information, manages file replicas and volume policies.
5.3.1 xtfsutil for Files
When called without any option xtfsutil prints the XtreemFS specific information for a volume, directory, softlink or file.
$> cd /xtreemfs
$> echo 'Hello World' > test.txt
$> xtfsutil test.txt
will produce output similar to the following:
Path (on volume)     /test.txt
XtreemFS file Id     1089e4fb-9eb9-46ea-8acf-91d10c2170e3:2
XtreemFS URL         pbrpc://localhost:32638/xtreemfs/test.txt
Owner                user
Group                users
Type                 file
Replication policy   WqRq
XLoc version         0
Replicas:
  Replica 1
     Striping policy     STRIPING_POLICY_RAID0 / 1 / 128kB
     Replication Flags   partial
     OSD 1               test-osd1/127.0.0.1:32641
  Replica 2
     Striping policy     STRIPING_POLICY_RAID0 / 1 / 128kB
     Replication Flags   partial
     OSD 1               test-osd0/127.0.0.1:32640
  Replica 3
     Striping policy     STRIPING_POLICY_RAID0 / 1 / 128kB
     Replication Flags   partial
     OSD 1               test-osd2/127.0.0.1:32642
The fileID is the unique identifier within XtreemFS, e.g. used by the OSD to identify the file's objects. The owner/group fields are shown as reported by the MRC, you may see other names on your local system if there is no mapping (i.e. the file owner does not exist as a user on your local machine). The XtreemFS URL shows you on which MRC the volume is hosted and the name of the volume. This file has three replicas and is replicated with the WqRq policy (majority voting).
Changing the Replication Policy
The replication policy defines how a file is replicated. The policy can only be changed for a file that has no replicas. If you wish to change the policy for a replicated file, you have to remove all replicas first.
To change the replication policy, execute xtfsutil with the following options:
$> xtfsutil --set-replication-policy ronly /xtreemfs/test.txt
The following values (or its aliases stated in parentheses) can be passed to --set-replication-policy:
- none
- File is not replicated.
- ronly (readonly)
- File is read-only replicated and will be marked as read-only, i.e. the file cannot be modified as long as the replication policy is set to ronly.
- WqRq (quorum), WaR1 (all)
- The file will be read-write replicated and can be modified. Please refer to the Section 6.1 for more information on both policies and their properties.
Adding and Removing Replicas
Replicas can be added for files that have a replication policy defined, i.e. not none. When adding a replica, you need to specify on which OSD to create the new replica. Alternatively, you can use AUTO instead of an OSD UUID. With AUTO set, the xtfsutil will automatically select an OSD.
To add a replica execute:
$> xtfsutil --add-replica AUTO /xtreemfs/test.txt
For read-only replicated files, replicas are partial by default. To create a full replica, you can use the --full flag when adding a replica. For read-write replicated files, all replicas are equal and there is no further options.
In case you want to select an OSD for a new replica manually, you can retrieve a list of up to 10 OSDs for a file. The MRC automatically filters and sorts the list of OSDs depending on the policies set for a volume. In addition, the MRC also excludes all OSDs that already have a replica of that file. To retrieve this list execute:
$> xtfsutil --list-osds /xtreemfs/test.txt
OSDs suitable for new replicas:
  test-osd1
  test-osd2
To remove a replica, pass the OSD's UUID to xtfsutil:
$> xtfsutil --delete-replica test-osd1 /xtreemfs/test.txt
5.3.2 xtfsutil for Volumes
To display the volume policies and settings, execute xtfsutil on the mountpoint without any options.
$> xtfsutil /xtreemfs
will produce output similar to the following:
Path (on volume)     /
XtreemFS file Id     1089e4fb-9eb9-46ea-8acf-91d10c2170e3:1
XtreemFS URL         pbrpc://localhost:32638/replicated
Owner                user
Group                users
Type                 volume
Free/Used Space      24 GB / 6 bytes
Num. Files/Dirs      1 / 1
Access Control p.    2
OSD Selection p.     1000,3002
Replica Selection p. default
Default Striping p.  STRIPING_POLICY_RAID0 / 1 / 128kB
Default Repl. p.     WqRq with 3 replicas
Changing the Default Striping Policies
Currently, it is not possible to change the striping policy of an existing file, as this would require rearrangements and transfers of data between OSDs. However, it is possible to define individual striping policies for files that will be created in the future. This can be done by changing the default striping policy of the parent directory or volume.
The striping policy can be changed with xtfsutil as follows:
$> xtfsutil --set-dsp -p RAID0 -w 4 -s 256 /xtreemfs
This will cause a RAID0 striping policy with 256kB stripe size and four OSDs to be assigned to all newly created files in /xtreemfs.
When creating a new file, XtreemFS will first check whether a default striping policy has been assigned to the file's parent directory. If this is not the case, the default striping policy for the volume will be used as the striping policy for the new file. Changing a volume's or directory's default striping policy requires superuser access rights, or ownership of the volume or directory.
Changing the Default Replication Policy
The Default Replication Policy defines how new files on a volume are replicated. This policy can be set on the volume and is valid for all sub-directories. It affects only new files and doesn't modify the replication settings for existing files.
The replication policy can be changed as follows. In this example, all files will have three replicas with WqRq mode.
$> xtfsutil --set-drp --replication-policy WqRq \
            --replication-factor 3 /xtreemfs
The following values (or its aliases stated in parentheses) can be passed to --replication-policy:
- none
- New files are not replicated.
- ronly (readonly)
- Files are initially created without replicas and can be modified until they are closed. On close, the file is set to read-only and the replicas are created. Replicas are partial by default. Full replicas will be created if the --full flag is set.
- WqRq (quorum), WaR1 (all)
- New files are read-write replicated and can be modified. Please refer to the Section 6.1 for more information on both policies and their properties.
Setting Volume Quota
By default no quota is set for Volumes. If a quota for a volume is set and a client wants to open a file the MRC will check if the quota is exceeded and responses accordingly. The quota of a volume can be set as follows. In this example the quota of the a volume will be set to 1 GB
$>xtfsutil --set-quota 1G /xtreemfs
M(B), G(B) and T(B) can be used as multipliers. To disable a previously set quota the quota can be set to 0, i.e. the following command can be used
$>xtfsutil --set-quota 0 /xtreemfs
5.3.3 Changing OSD and Replica Selection Policies
When creating a new file, OSDs have to be selected on which to store the file content. Likewise, OSDs have to be selected for a newly added replica, as well as the order in which replicas are contacted when accessing a file. How these selections are done can be controlled by the user.
OSD and replica selection policies can only be set for the entire volume. Further details about the policies are described in Sec. 7.3.
The policies are set and modified with the xtfsutil tool on the volume (mount point). When called without any options, xtfsutil will also show the policies currently set for the volume. A policy that controls the selection of a replica is set as follows:
$> xtfsutil --set-rsp dcmap /xtreemfs
This will change the current replica selection policy to a policy based on a data center map.
Note that by default, there is no replica selection policy, which means that the client will attempt to access replicas in their natural order, i.e. the order in which the replicas have been created.
Similar to replica selection policies, OSD selection policies are set and retrieved:
$> xtfsutil --set-osp dcmap /xtreemfs
sets a data center map-based OSD selection policy, which is invoked each time a new file or replica is created. The following predefined policies exist (see Sec. 7.3 and man xtfsutil for details):
- default
- The default OSD selection policy selects a random subset of OSDs that are responsive and have more than 2GB of free disk space.
- fqdn
- Selects OSDs based on the size of the post-fix match of the fully qualified domain names and on the free space.
- dcmap
- Selects OSDs based on the distance defined in the datacenter map and on the free space.
- vivaldi
- Selects OSDs based on the distance of the Vivaldi coordinates between client and OSD and on the free space.
- roundrobin
- Selects OSDs based on a round robin manner regarding the host name of the OSDs.
In addition, custom policies can be set by passing a list of basic policy IDs to be successively applied instead of a predefined policy name.
5.3.4 Setting and Listing Policy Attributes
OSD and replica selection policy behavior can be further specified by means of policy attributes.
An individual attribute for a policy (see Section 7.3.2) can be defined by using a combined key consisting of policy ID to the attriubte name, e.g.:
 $> xtfsutil --set-pattr 1001.domains \
    --value "*.xtreemfs.org bla.com" /xtreemfs
Policy attributes can be removed by setting an empty value, e.g.:
$> xtfsutil --set-pattr 1001.domains --value "" /xtreemfs
A list of all policy attributes that have been set can be shown as follows:
$> xtfsutil --list-pattrs /xtreemfs
Please note that it is no longer possible to specify global policy attributes without a specific policy ID.
5.3.5 Modifying Access Control Lists
In some cases, it may be necessary to enforce access control on a file or directory at a finer granularity than expressible with simple "rwx"-like access rights. XtreemFS supports Access Control Lists (ACLs) to set individual access rights for users and groups.
An ACL entry for the user someone with the value rx ("read or execute") can be added as follows:
$> xtfsutil --set-acl u:someone:rx /xtreemfs
An existing entry can be removed as follows:
$> xtfsutil --del-acl u:someone /xtreemfs
Please be aware that when files or directories are accessed, the actual evaluation of ACL entries depends upon the effective authorization policy on the volume (see Section 7.2). With a POSIX authorization policy, ACL entries will be evaluated as described at http://www.suse.de/~agruen/acl/linux-acls/online.
5.3.6 Snapshots
XtreemFS is capable of taking file system snapshots. A snapshot captures an instantaneous image of all files and directories in a volume, which can later be accessed in a read-only manner.
As of XtreemFS 1.4, functionality for creating, listing and deleting snapshots has been integrated in xtfsutil. The former xtfs_snap utility has been removed.
Support for snapshots comes at the cost of additional storage and I/O overhead, as snapshots require copy-on-write versioning of files across the OSDs. Snapshots are therefore disabled by default. They can be enabled as follows:
$> xtfsutil --enable-snapshots /path/to/mounted/volume
Once snapshots have been enabled, a snapshot named mySnapshot can be taken as follows:
$> xtfsutil --create-snapshot mySnapshot \
   /path/to/mounted/volume/directory
Note that capturing snapshots requires privileged access rights (ownership or superuser rights) on the volume.
It is also possible to capture a snapshot of a given directory without including any subdirectories:
$> xtfsutil --create-snapshot-non-recursive mySnapshot \
   /path/to/mounted/volume/directory
A list of all snapshots that exist on the volume can be displayed as follows:
$> xtfsutil --list-snapshots /path/to/mounted/volume
Snapshots are exposed as read-only volumes. To access a snapshot, it is necessary to mount it. The volume name is composed of the original volume name and the snapshot name, separated by an @ character. Mounting a snapshot works as follows:
$> mount.xtreemfs localhost/volume@mySnapshot \
   /path/to/mounted/volume2
A mounted volume snapshot can be browsed normally, and all files can be read as on the original volume. However, any attempt to write data on a snapshot will result in an EPERM error.
A snapshot mySnapshot that is no longer needed can be removed as follows:
$> xtfsutil --delete-snapshot mySnapshot /path/to/mounted/volume
Please be aware that removing a snapshot does not automatically reclaim any storage space occupied by prior versions. To dispose of obsolete and redundant versions on a specific OSD, it is necessary to perform a version cleanup run with the xtfs_cleanup tool:
$> xtfs_cleanup -dir localhost:32638 -v \
   uuid:8bca70da-c963-43c7-b30b-d0d605d39fa7
Note: A snapshot only captures a file in its current state if it is closed. Files that are open when taking a snapshot are captured in the last state in which they were before they were opened. Since files are implicitly closed on an OSD through a timeout rather than an explicit close call, it may happen that files are not included in a snapshot despite having been closed at application level before the snapshot was taken. To make sure a change to a specific file is included in a subsequent snapshot, it is necessary to wait for the close timeout on the OSD before taking the snapshot, which by default is set to 60 seconds.
5.4 Test Tools
XtreemFS provides two tools to simplify testing. xstartserv can be used to start and stop XtreemFS servers manually. xtestenv automatically sets-up an entire test environment with servers and mounted clients. In addition, xtestenv can be used to execute the automatic integration tests.
Chapter 6
Replication
XtreemFS offers replication of all data. On the one hand, the Directory Service (DIR) and the Metadata Catalog (MRC) are replicated at database level. On the other hand, files are replicated on the OSDs with read/write or with read-only replication. In this chapter, we describe how these replication mechanisms work, their requirements and potential use-cases.
6.1 Read/Write File Replication
File that are replicated with read/write replication have the same semantics as non-replicated files. That means that all operations can be executed on those files and that data is kept consistent across replicas. Applications and users won't see a difference between read/write replicated and regular files.
6.1.1 Technical Details
Internally, the read/write replication is implemented using the primary/backup approach with leases. When a file is opened, all OSDs that have a replica "talk" to each other to decide which replica becomes the primary. In XtreemFS we use leases for the primary election, this means that an OSD will become primary for some time. As long as the file is accessed on the OSD, the lease will be periodically renewed in the background. If the OSD fails, the lease times out and another OSD can become primary.
Once a replica has acquired the lease to become primary, it checks with the other replicas to ensure all replicas are in a consistent state. After this so called replica reset phase, the primary processes client operations.
Reads can be executed locally on the primary. However, operations that modify data such as write and truncate, are executed on the primary which passes these updates on to the other replicas (backups).
The replication of files adds significant communication overhead to keep replicas in sync. When a file is opened, the OSD which the client contacts requires at least three message round-trips to acquire the lease and to execute the replica reset. Once a primary was elected, read operations can be executed locally without any communication. Truncate and write require a single round-trip between the primary and the backup OSDs.
Depending on the selected replication policy, the read/write replication can tolerate some replica failures. The WqRq (write quorum, read quorum) policy employs majority voting and can tolerate replica failures as long as a majority of replicas is available. This is the most fault-tolerant strategy in XtreemFS. However, it guarantees only that data is stored on a majority of the replicas. If you lose more replicas permanently, data might be lost. Please note that, unlike the term read quorum suggests, read operations are not executed on the majority of replicas. Instead it means that a majority of replicas has to be available during the replica reset phase in order to synchronize the primary's replica. After this phase read operations are executed locally. Please keep in mind that the majority of two replicas is two, i.e. using WqRq with two replicas will provide you no availability in case of a replica failure. Use the WqRq policy only if you have at least 3 OSDs - otherwise select the WaR1 policy.
The WaR1 (write all, read 1) policy writes updates to all replicas which yields higher data safety. However, if any replica is unavailable, modifications are not possible and the client will receive a write error. Local data can be still read from an OSD.
6.1.2 Limitations
Due to the communication overhead, the read/write replication should only be used for up to ten replicas. If you need more replicas or if you need replicas for caching, you should consider the read-only replication.
6.1.3 Setup
To enable read/write replication, it is necessary to specify a respective replication policy. Replication policies that enable read/write replication are WqRq and WaR1.
A replication policy can either be specified for an existing file or as a default policy for the entire volume. In the former case, replicas need to be added manually. In the latter case, a default replication factor needs to be specified that defines the number of replicas that are initially created. Please be aware that a default replication policy only affects newly created files, i.e. does not automatically add replicas to existing files!
For details on how to define replication policies, please refer to Section 5.3.1 and 5.3.2.
The DIR status page has a subpage which shows the replication status for open files. It's accessible at http://localhost:30638/replica_status. Replace localhost with the hostname of the DIR service if you're not on the same machine.
6.2 Read-Only File Replication
The read-only is designed for use-cases where you have many replicas that are not modified. Since files cannot be changed, the replicas don't need to be coordinated. Therefore, this replication mode can handle as many replicas as you like, e.g. to create copies of files close to consumers. One use-case for the read-only replication is to build a content-distribution network (CDN) like infrastructure.
Read-only replicas are either full or partial. Full replicas immediately copy the file data from other replicas when they are created. XtreemFS uses a rarest-first strategy (similar to BitTorrent) to increase the replication factor as quickly as possible. In contrast, partial replicas are initially empty and fetch the file data (objects) on demand when requested by a client. Partial replicas also pre-fetch a small number of objects to reduce latency for further client reads.
6.2.1 Limitations
Files that are read-only replicated can only be opened in read-only mode and cannot be modified. To allow existing applications to take advantage of the read-only replication without modifications, XtreemFS offers "replicate-on-close". When the default replication policy for a volume is set to "ronly", files can be opened and modified like regular files until they are closed. Once a file is closed, it is set to read-only and is replicated according to the replication factor set for the volume. This mode should, however, not be used for data safety as there are no guarantees that all replicas were created successfully when the close() operation returns. For data safety, please use read/write replication.
6.2.2 Setup
Similar as with read/write replication, enabling read-only replication requires a read-only replication policy to be set. The respective policy name is ronly. It can either be specified for an existing file or as a default policy for the entire volume. For details on how to define replication policies, please refer to Section 5.3.1 and 5.3.2.
6.3 MRC and DIR Replication
Aside from file replication across OSDs, XtreemFS also supports MRC and DIR replication to increase data safety. MRC replication covers all file system metadata, whereas DIR replication covers configuration information of services as well as volumes.
6.3.1 Technical Details
DIR and MRC replication rely on the same principle as read-write replication of files. A primary replica, which is distinguished by means of a lease, accepts all updates and disseminates these to all backup replicas in the same order. When the primary fails, the lease will eventually expire and one of the former backup replicas can become primary. Unlike file replication, which may involve a different set of OSDs for each file, an MRC or DIR replicates its entire database. A replicated MRC or DIR consists of at least two individual server instances. Note that you will need three or more instances to be able to transparently recover from failures, as a majority of replicas always needs to be available to make progress.
6.3.2 Setup
To enable database replication across a set of DIR or MRC instances, it is necessary to enable replication and configure its parameters. This needs to be done prior to starting up the services. The basic steps are the following:
- Enable the replication plug-in on all replicated MRC/DIR instances
- Configure replication parameters across all instances
- Start up all replicated MRC/DIR instances
Enabling and Configuring MRC Replication
The replication of the database requires that all records are synchronously written to disk. Therefore, the parameter babudb.sync has to be changed to the value FSYNCDATA in the MRC configuration file /etc/xos/xtreemfs/mrcconfig.properties:
babudb.sync = FSYNCDATA
To configure multiple MRC instances as replicas of each other, it is necessary to enable and configure the replication plug-in across these instances. This is done by setting the property babudb.plugin.0 in each MRC configuration file, such that it points to the plug-in's configuration file. In order to activate the plug-in, un-comment the following line in the MRC configuration file /etc/xos/xtreemfs/mrcconfig.properties:
babudb.plugin.0 = /etc/xos/xtreemfs/server-repl-plugin/mrc.properties
Now, it is necessary to configure the replication plug-in. For this purpose, open /etc/xos/xtreemfs/server-repl-plugin/mrc.properties with a text editor. The configuration file will look as follows:
...

# participants of the replication including this replica
babudb.repl.participant.0 = first-MRC-replica
babudb.repl.participant.0.port = 35676
babudb.repl.participant.1 = second-MRC-replica
babudb.repl.participant.1.port = 35676
babudb.repl.participant.2 = third-MRC-replica
babudb.repl.participant.2.port = 35676

...

# number of servers that at least have to be up to date
babudb.repl.sync.n = 2

...
Each MRC replica has to be specified by the properties babudb.repl.participant.n and babudb.repl.participant.n.port, where n defines the replica number. Please note that the configured port is not the same as the port of the MRC since it is used solely by the database replication. Hostnames have to be resolvable, and hosts have to be able to reach each other on the respective ports. Please also make sure that replica lists are equivalent across all replicated MRC instances, i.e. each can reach all other hosts in the replica set.
babudb.repl.sync.n defines the number of servers that need to respond to an update before acknowledging the update to the client. To ensure data safety in the face of failures, it is necessary to set the property to a number that reflects at least a majority of all replicas. Consequently, a failure tolerant setup requires at least three MRC replicas as the majority of it is two.
Note that it is necessary to explicitly enable SSL if server-to-server authentication and encryption between replicas are required, regardless of whether an SSL-based XtreemFS installation was set up. This is because BabuDB establishes its own connection to exchange data with other replicated instances.
Please make sure that all replicated instances have consistent configurations before starting them up, which includes replica lists, babudb.repl.sync.n parameters as well as SSL settings if necessary.
When mounting a volume with an XtreemFS client it is not necessary to specify the list of MRC replicas since the client automatically retrieves the MRC replicas of each volume.
Enabling and Configuring DIR Replication
DIR replication is enabled and configured in the exact same way as MRC replication. Change /etc/xos/xtreemfs/server-repl-plugin/dir.properties accordingly to configure the plug-in. If you use the default DIR configuration, the parameter babudb.sync is already set to FSYNCDATA.
In order to ensure that MRCs and OSDs know all DIR replicas, you have to add the addresses of all DIR replicas to each MRC and OSD configuration file (e.g., /etc/xos/xtreemfs/mrcconfig.properties and /etc/xos/xtreemfs/osdconfig.properties). Specify the first DIR replica in the options dir_service.host and dir_service.port and all subsequent ones in the options dir_service.<i>.host and dir_service.<i>.port where i starts from one. For example:
dir_service.host = first-DIR-replica
dir_service.port = 32638
dir_service1.host = second-DIR-replica
dir_service1.port = 32638
dir_service2.host = third-DIR-replica
dir_service2.port = 32638
This allows the MRCs and OSDs to fail over to each DIR replica. The default MRC and OSD configuration files already contain commented entries which you just have to un-comment and edit.
Here, the port of each DIR replica corresponds to the port which is configured in the DIR configuration with the parameter listen.port and defaults to 32638. Do not mix it up with the the one you specified in the replication plug-in configuration.
When mounting a volume with an XtreemFS client, you have to provide all DIR replicas as comma separated list before the volume name. Given our example from above, you can mount a volume myVol as follows:
mount.xtreemfs first-DIR-replica,second-DIR-replica,third-DIR-replica/myVol
Startup and Access
Once all service instances have been configured, they can be started up individually as described in Section 3.3.1. From a user's point of view, a replicated MRC behaves exactly like a non-replicated MRC. Failures will be transparently handled by the system and hidden from users to the best possible extent. For the service to remain operable, however, at least a majority of all replicas in the list have to be reachable. Please note that the default lease timeout for the DIR/MRC replication is 60 seconds i.e., a fail-over to another replica may take up to 60 seconds.
Chapter 7
Policies
Many facets of the behavior of XtreemFS can be configured by means of policies. A policy defines how a certain task is performed, e.g. how the MRC selects a set of OSDs for a new file, or how it distinguishes between an authorized and an unauthorized user when files are accessed. Policies are a means to customize an XtreemFS installation.
XtreemFS supports a range of predefined policies for different tasks. Alternatively, administrators may define their own policies in order to adapt XtreemFS to customer demands. This chapter contains information about predefined policies, as well as mechanisms to implement and plug in custom policies.
7.1 Authentication Policies
Any operation on a file system is executed on behalf of a user. The process of determining the user bound to a request is generally referred to as user authentication. To render user authentication customizable, the MRC allows administrators to specify an authentication policy by means of an Authentication Provider. Authentication Providers are modules that implement different methods for retrieving user and group IDs from requests.
The following predefined authentication providers exist:
7.1.1 UNIX uid/gid - NullAuthProvider
The NullAuthProvider is the default Authentication Provider. It simply uses the user ID and group IDs sent by the XtreemFS client. This means that the client is trusted to send the correct user/group IDs.
The XtreemFS Client will send the user ID and group IDs of the process which executed the file system operation, not of the user who mounted the volume!
The superuser is identified by the user ID root and is allowed to do everything on the MRC. This behavior is similar to NFS with no_root_squash.
7.1.2 Plain SSL Certificates - SimpleX509AuthProvider
XtreemFS supports two kinds of X.509 certificates which can be used by the client. When mounted with a service/host certificate the XtreemFS client is regarded as a trusted system component. The MRC will accept any user ID and groups sent by the client and use them for authorization as with the NullAuthProvider. This setup is useful for volumes which are used by multiple users.
The second certificate type are regular user certificates. The MRC will only accept the user name and group from the certificate and ignore the user ID and groups sent by the client. Such a setup is useful if users are allowed to mount XtreemFS from untrusted machines.
Both certificates are regular X.509 certificates. Service and host certificates are identified by a Common Name (CN) starting with host/ or xtreemfs-service/, which can easily be used in existing security infrastructures. All other certificates are assumed to be user certificates.
If a user certificate is used, XtreemFS will take the Distinguished Name (DN) as the user ID and the Organizational Unit (OU) as the group ID.
Superusers must have xtreemfs-admin as part of their Organizational Unit (OU).
7.2 Authorization Policies
Before executing an operation, a file system needs to check whether the user bound to the operation is sufficiently authorized, i.e. is allowed to execute the operation. User authorization is managed by means of access policies, which reside on the MRC. Unlike authentication policies which are bound to an MRC, access policies can be defined for each volume. This has to be done when the volume is created (see man mkfs.xtreemfs). Various access policies can be used:
- Authorize All Policy (policy Id 1)
No authorization - everyone can do everything. This policy is useful if performance of metadata operations matters more than security, since no evaluation of access rights is needed.
- POSIX ACLs & Permissions (policy Id 2)
This access policy implements the traditional POSIX permissions commonly used on Linux, as well as POSIX ACLs, an extension that provides for access control at the granularity of single users and groups. POSIX permissions should be used as the default, as it guarantees maximum compatibility with other file systems.
- Volume ACLs (policy Id 3)
Volume ACLs provide an access control model similar to POSIX ACLs & Permissions, but only allow one ACL for the whole volume. This means that there is no recursive evaluation of access rights which yields a higher performance at the price of a very coarse-grained access control.
7.3 OSD and Replica Selection Policies
When a new file is created or a replica is automatically added to a file, the MRC must decide on a set of OSDs for storing the file content. To select the most suitable subset among all known OSDs, OSD Selection Policies are used.
Replica selection is a related problem. When a client opens a file with more than one replica, the MRC uses a replica selection policy to sort the list of replicas for the client. Initially, a client will always attempt to access the first replica in the list received from the MRC. If a replica is not available, it will automatically attempt to access the next replica from the list, and restart with the first replica if all attempts have failed. Replica selection policies can be used to sort the replica lists, e.g. to ensure that clients first try to access replicas that are close to them.
Both OSD and replica selection policies share a common mechanism, in that they consist of basic policies that can be arbitrarily combined. Input parameters of a basic policy are a set of OSDs, the list of the current replica locations of the file, and the IP address of the client on behalf of whom the policy was called. The output parameter is a filtered and potentially sorted subset of OSDs. Since OSD lists returned by one basic policy can be used as input parameters by another one, basic policies can be chained to define more complex composite policies.
OSD and replica selection policies are assigned at volume granularity. For further details on how to set such policies, please refer to Sec. 5.3.3.
7.3.1 Attributes
The behavior of basic policies can be further refined by means of policy attributes. Policy attributes are extended attributes with a name starting with xtreemfs.policies., such as xtreemfs.policies.minFreeCapacity. Each time a policy attribute is set, all policies will be notified about the change. How an attribute change affects the policy behavior depends on the policy implementation.
7.3.2 Predefined Policies
Each basic policy can be assigned to one of the three different categories called filtering, grouping and sorting. Filtering policies generate a sub-list from a list of OSDs. The sub-list only contains those OSDs from the original list that have a certain property. Grouping policies are used to select a subgroup from a given list of OSDs. They basically work in a similar manner as filtering policies, but unlike filtering policies, they always return a list of a fixed size. Sorting policies generate and return a reordered list from the input OSD list, without removing any OSDs.
The following predefined policies exist:
Filtering Policies
- Default OSD filter (policy ID 1000)
Removes OSDs from the list that are either dead or do not have sufficient space. By default, the lower space limit for an OSD is 2GB, and the upper response time limit is 5 minutes.
Attributes:
- free_capacity_bytes: the lower space limit in bytes
- offline_time_secs: the upper response time limit in seconds
- osd_health_status: OSD Health status which is excluded (see section 3.3.3). Possible Values:
- warning: WARNING and FAILED OSDs are excluded
- failed: FAILED OSDs are excluded
- custom attributes (see Section 7.3.3)
- FQDN-based filter (policy ID 1001)
Removes OSDs from the list that do not match any of the domains in a given set. By default, the set of domains contains `*', which indicates that no domains are removed.
Attributes:
- domains: a comma or space-separated list of domain names. The list may include leading and trailing `*'s, which will be regarded as wildcard characters.
- UUID-based filter (policy ID 1002)
Removes OSDs from the list that do not match any of the UUIDs in a given set. By default, the set of UUIDs contains `*', which indicates that no domains are removed.
Attributes:
- uuids: a comma or space-separated list of OSD UUIDs. The list may include leading and trailing `*'s, which will be regarded as wildcard characters.
Grouping Policies
- Data center map-based grouping (policy ID 2000)
Removes all OSDs from the OSD set that have been used in the file's replica locations list already and selects the subset of OSDs that is closest to the client and provides enough OSDs for the new replica in a single data center.
This policy uses a statically configured datacenter map that describes the distance between datacenters. It works only with IPv4 addresses at the moment. Each datacenter has a list of matching IP addresses and networks which is used to assign clients and OSDs to datacenters. Machines in the same datacenter have a distance of 0.
This policy requires a datacenter map configuration file in
/etc/xos/xtreemfs/datacentermap on the MRC machine which is loaded at MRC startup. This config file must contain the following parameters:
- datacenters=A,B,C
A comma separated list of datacenters. Datacenter names may only contain a-z, A-Z, 0-9 and _.
- distance.A-B=100
For each pair of datacenters, the distance must be specified. As distances are symmetric, it is sufficient to specify A to B.
- A.addresses=192.168.1.1,192.168.2.0/24
For each datacenter a list of matching IP addresses or networks must be specified.
- max_cache_size=1000
Sets the size of the address cache that is used to lookup IP-to-datacenter matches.
A sample datacenter map could look like this:
	datacenters=BERLIN,LONDON,NEW_YORK
	distance.BERLIN-LONDON=10
	distance.BERLIN-NEW_YORK=140
	distance.LONDON-NEW_YORK=110
	BERLIN.addresses=192.168.1.0/24
	LONDON.addresses=192.168.2.0/24
	NEW_YORK.addresses=192.168.3.0/24,192.168.100.0/25
	max_cache_size=100
- FQDN-based grouping (policy ID 2001)
Removes all OSDs from the OSD set that have been used in the file's replica locations list already and selects the subset of OSDs that is closest to the client and provides enough OSDs for the new replica in a single domain.
This policy uses domain names of clients and OSDs to determine the distance between a client and an OSD, as well as if OSDs are in the same domain.
Sorting Policies
- Data center map-based sorting (policy ID 3000)
Sorts the list of OSDs in ascending order of their distance to the client, according to the data center map.
- DNS based OSD Selection (policy ID 3001)
The FQDN of the client and all OSDs is compared and the maximum match (from the end of the FQDN) is used to sort the OSDs. The policy sorts the list of OSDs in descending order by the number of characters that match. This policy can be used to automatically select OSDs which are close to the client, if the length of the match between two DNS entries also indicate a low latency between two machines.
- Shuffling (policy ID 3002)
Shuffles the given list of OSDs.
- Vivaldi network coordinates based sorting (policy ID 3003)
Sorts the list of OSDs in ascending order of their distance to the client, according to the vivaldi coordinates of the client and OSDs. This policy requires to enable vivaldi in the client (see section 7.3.4 for details).
- Host round robin based sorting (policy ID 3004)
Sorts the list of OSDs in a round robin manner regarding the host name of the OSDs. If multiple OSDs run per host, this policy guarantees a distribution over multiple hosts.
7.3.3 OSD Selection based on Custom Attributes
The default filtering policy (policy ID 1000) supports the use of policy attributes to further refine the filtering of OSDs. Given that different OSDs have individual custom configuration parameters, it is possible to restrict the selection based on these attributes and parameters.
To select a subset of all OSDs that have a certain custom configuration parameter, it is necessary to define a policy attribute on the volume with the same name as the custom parameter and a value consisting of a space-separated list of matching OSDs.
Using not. in front of a custom configuration parameters will cause all OSDs to be exluded that match the value of this parameter.
Example: Three OSDs exist with the following configurations:
  uuid = OSD1
  ...
  config.country = DE
and
  uuid = OSD2
  ...
  config.country = US
and
  uuid = OSD3
  ...
  config.country = UK
Executing
%> xtfsutil --set-pattr 1000.country --value US DE <mountpoint>
will cause the first two OSD to be regarded as eligible for new files and replicas.
Executing
%> xtfsutil --set-pattr 1000.not.country --value US <mountpoint>
will cause the OSDs from DE and UK to be regarded as eligible for new files and replicas.
For further details on how to define custom configuration parameters, please refer to Section 3.2.7. For further details on how to specify policy attributes, please refer to Section 5.3.4.
7.3.4 Vivaldi
Vivaldi network coordinates are calculated between all OSDs. Clients optionally calculate their coordinates against the available OSDs.
In order to take advantage of them, two things are necessary.
- The vivaldi replica and OSD selection policies must be set at the MRC for the volume(s) (see section 5.3.3 for details).
- The clients must be configured to calculate their own coordinates relative to the OSDs.
The latter is done by passing some arguments to the mount command. In most cases the following will suffice.
 $> mount.xtreemfs --vivaldi-enable \
    remote.dir.machine/myVolume /xtreemfs
All client options and their descriptions are available on the help screen of the mount command.
The server options are listed in the config files dirconfig.properties and osdconfig.properties.
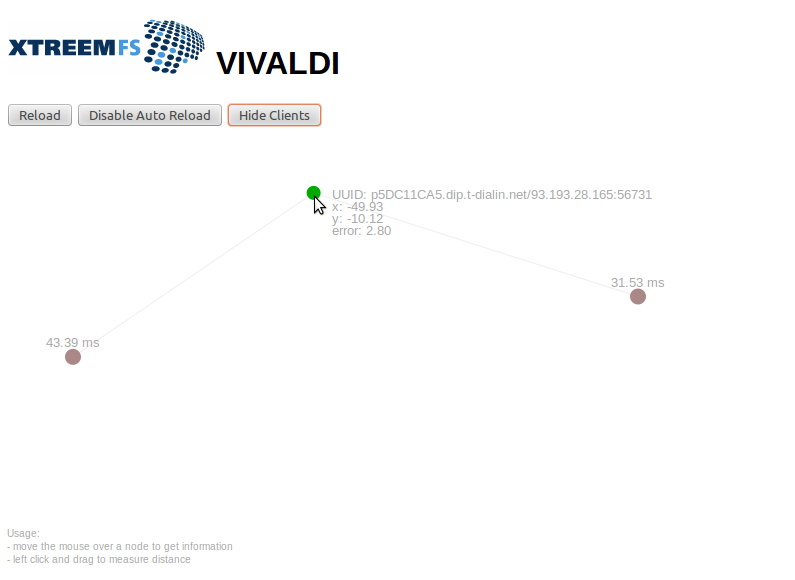
Figure 7.1: Vivaldi visualization showing two OSDs and one client.
There is a built-in visualization for the vivaldi coordinates (Fig. 7.1).
It is accessible from the DIR status page or directly via http://localhost:30638/vivaldi.
Per default, only the OSDs are shown.
Clients can also be told to send their coordinates to the DIR by adding --vivaldi--enable-dir-updates to the mount command.
Be aware that this causes extra traffic between the client and the DIR every time the client recalculates its coordinates.
The raw data which is used by the visualization can be queried from http://localhost:30638/vivaldi/data.
7.4 Striping Policies
XtreemFS allows the content, i.e. the objects of a file to be distributed among several storage devices (OSDs). This has the benefit that the file can be read or written in parallel on multiple OSDs in order to increase throughput. To configure how files are striped, XtreemFS supports striping policies.
A striping policy is a rule that defines how the objects are distributed on the available OSDs. Currently, XtreemFS implements only the RAID0 policy which simply stores the objects in a round robin fashion on the OSDs. The RAID0 policy has two parameters. The striping width defines to how many OSDs the file is distributed. If not enough OSDs are available when the file is created, the number of available OSDs will be used instead; if it is 0, an I/O error is reported to the client. The stripe size defines the size of each object.
Striping over several OSDs enhances the read and write throughput to a file. The maximum throughput depends on the striping width. However, using RAID0 also increases the probability of data loss. If a single OSD fails, parts of the file are no longer accessible, which generally renders the entire file useless. Replication can mitigate the problem but has all the restrictions described in Sec. 6.2.
7.5 Plug-in Policies
To further customize XtreemFS, the set of existing policies can be extended by defining plug-in policies. Such policies are Java classes that implement a predefined policy interface. Currently, the following policy interfaces exist:
- org.xtreemfs.common.auth.AuthenticationProvider
interface for authentication policies
- org.xtreemfs.mrc.ac.FileAccessPolicy
interface for file access policies
- org.xtreemfs.mrc.osdselection.OSDSelectionPolicy
interface for OSD and replica selection policies
Note that there may only be one authentication provider per MRC, while file access policies and OSD selection policies may differ for each volume. The former one is identified by means of its class name (property authentication_provider, see Sec. 3.2.4, 3.2.7), while volume-related policies are identified by ID numbers. It is therefore necessary to add a member field
public static final long POLICY_ID = 4711;
to all such policy implementations, where 4711 represents the individual ID number. Administrators have to ensure that such ID numbers neither clash with ID numbers of built-in policies (1-9), nor with ID numbers of other plug-in policies. When creating a new volume, IDs of plug-in policies may be used just like built-in policy IDs.
Plug-in policies have to be deployed in the directory specified by the MRC configuration property policy_dir. The property is optional; it may be omitted if no plug-in policies are supposed to be used. An implementation of a plug-in policy can be deployed as a Java source or class file located in a directory that corresponds to the package of the class. Library dependencies may be added in the form of source, class or JAR files. JAR files have to be deployed in the top-level directory. All source files in all subdirectories are compiled at MRC start-up time and loaded on demand.
Appendix A
Support
Please visit the XtreemFS website at www.xtreemfs.org for links to the user mailing list, bug tracker and further information.
Appendix B
Hadoop Integration
B.1 Introduction
XtreemFS is a distributed file system that can be used instead of HDFS, the distributed file system made by the developers of Hadoop.
Therefore it replaces the NameNode and the DataNodes provided by HDFS in a common Hadoop setup. A DIR is used instead of a NameNode, because it stores the information about where the files and their metadata are located at the OSDs and the MRC, like the NameNode does for DataNodes. These DataNodes hold the files that have been stored at HDFS. On XtreemFS these files are split into metadata and raw file data to be stored separately at a MRC and OSDs.
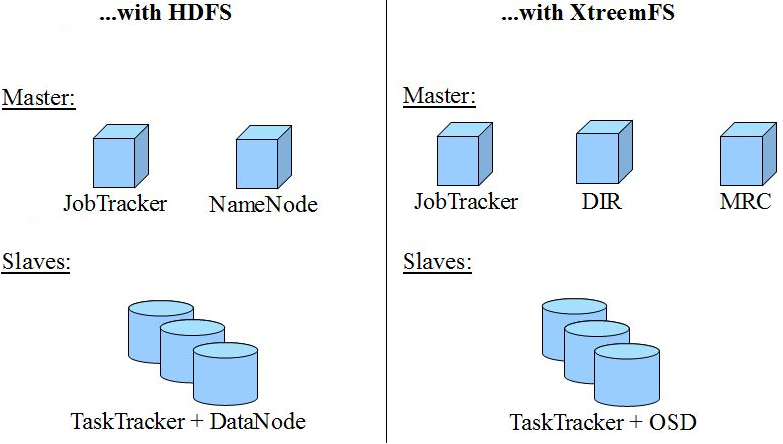
Figure B.1: Hadoop 1.x cluster setup recommendation
The three master services JobTracker (Hadoop 1.x) or Resourcemanager (Hadoop 2.x), DIR and MRC are required in a Hadoop configuration. They can run alone or in arbitrary combinations on the same machine. Hadoop can be used with an arbitrary number of Slaves. It is recommended to run a TaskTracker (Hadoop 1.x) or NodeManager (Hadoop 2.x) together with an OSD on each Slave machine to improve performance, but it is not mandatory.
B.2 Quick Start
This section will help you to set up a simple Hadoop configuration with all necessary services running on the same host.
Required software:
Setup:
- Install and start XtreemFS:
Follow the instructions given by the quick start guide for XtreemFS, available at Sec.1. Notice
that the DIR is reachable at localhost:32638, because this information will be important later.
- Download and extract Hadoop
- Setup Hadoop environment variables:
For Hadoop you have so set the following environment variable:
- Hadoop 1.x:
export HADOOP_PREFIX=<path to Hadoop directory>
- Hadoop 2.x:
		export HADOOP_PREFIX=<path to Hadoop directory>
		export HADOOP_MAPRED_HOME=$HADOOP_PREFIX
		export HADOOP_COMMON_HOME=$HADOOP_PREFIX
		export HADOOP_HDFS_HOME=$HADOOP_PREFIX
		export HADOOP_YARN_HOME=$HADOOP_PREFIX
		export HADOOP_CONF_DIR=$HADOOP_PREFIX/etc/hadoop
- Configure Hadoop to use XtreemFS instead of HDFS:
- After downloading and extracting Hadoop you have to make sure it will find the XtreemFSHadoopClient package.
The easiest way to do so is to download XtreemFSHadoopClient.jar into Hadoop's lib directory for Hadoop 1.x or share/hadoop/common/ directory for Hadoop 2.x, or to symlink it there.
Alternativly, you can add it to Hadoop's classpath. It can be edited in hadoop-env.sh which can be found in the conf directory of Hadoop. Assuming you put XtreemFSHadoopClient.jar to the other jar-libraries located at '/usr/share/java/', the resulting line should look like this.
export HADOOP_CLASSPATH="/usr/share/XtreemFSHadoopClient.jar"
Hint: If you use Hadoop 2.x and set Hadoop's classpath, you also have to set the -libjars parameter to the XtreemFSHadoopClient.jar path if you use the hadoop jar command, e.g.
	hadoop jar <jar> [mainClass] \
	-libjars=/usr/share/XtreemFSHadoopClient.jar ...
- Now you have to specify some properties in core-site.xml (in the conf (Hadoop 1.x) or etc/hadoop (Hadoop 2.x)
directory of Hadoop). If this file does not exist you can safely create it.
<configuration>

  <property>
    <name>fs.xtreemfs.impl</name>
    <value>org.xtreemfs.common.clients.hadoop.XtreemFSFileSystem</value>
    <description>The file system for xtreemfs: URIs.</description>
  </property>

  <property>
    <name>fs.AbstractFileSystem.xtreemfs.impl</name>
    <value>org.xtreemfs.common.clients.hadoop.XtreemFS</value>
    <description>
       The abstract file system for xtreemfs: URIs. (Hadoop 2.x only)
    </description>
</property>

  <property>
    <name>fs.default.name</name>
    <value>xtreemfs://localhost:32638</value>
    <description>Address for the DIR.</description>
  </property>

  <property>
    <name>xtreemfs.defaultVolumeName</name>
    <value>volumeName</value>
    <description>Name of the default volume to use within XtreemFS.</description>
  </property>

  <property>
    <name>io.file.buffer.size</name>
    <value>131072</value>
    <description>Default buffer size when accessing files.</description>
  </property>

</configuration>
- The first property is required to register the XtreemFSHadoopClient at Hadoop. Now you are able to access
XtreemFS by the Hadoop binary using the fs argument.
- The next property makes Hadoop use the DIR instead of a
NameNode, therefore address and port of the DIR has to be populated. In this case the DIR is located at
localhost:32638.
- The third property specifies the name of the default volume to use within XtreemFS. Make sure, that the volume (here named volumeName) does exist. If the volume is not available Hadoop will not be able to use XtreemFS.
- The last property tells Hadoop the buffer size that will be used when reading/writing files.
This size should be exactly the default stripesize of your volume. Note that this value is measured in bytes while the
stripe size of your volume usually is measured in kilo bytes.
Hint: By default Hadoop uses the current user as user ID and users as group ID for accessing XtreemFS. To change the used user ID and group ID, you have to set the following additional properties:
  <property>
    <name>xtreemfs.client.userid</name>
    <value>hadoopUserID</value>
    <description>
      UserID to be used by Hadoop while accessing XtreemFS.
    </description>
  </property>

  <property>
    <name>xtreemfs.client.groupid</name>
    <value>hadoopGroupID</value>
    <description>
      GroupID to be used by Hadoop while accessing XtreemFS.
    </description>
  </property>
Hint: If you want to use the XtreemFSHadoopClient with a SSL encrypted XtreemFS installation, you have to specify the following additional properties:
  <property>
    <name>xtreemfs.ssl.enabled</name>
    <value>true</value>
    <description>
       Enable/Disable SSL for the XtreemFSHadoopClient
    </description>
  </property>

  <property>
    <name>xtreemfs.ssl.protocol</name>
    <value>ssltls</value>
    <description>
      Optional. SSL/TLS version to use: ssltls, sslv3,
      tlsv1, tlsv11, tlsv12. ssltls (default) accepts
      all versions, the others accept only the exact
      version they name. tlsv12 is available in JDK 7+
      only. tlsv11 comes with JDK 6 or 7, depending on
      the vendor.
    </description>
  </property>

  <property>
    <name>xtreemfs.ssl.credentialFile</name>
    <value>credentialFile.p12</value>
    <description>Path to a PKCS#12 credential file.</description>
   </property>

  <property>
    <name>xtreemfs.ssl.credentialFile.passphrase</name>
    <value>passphrase</value>
    <description>Passphrase for the credential file.</description>
  </property>

  <property>
    <name>xtreemfs.ssl.trustedCertificatesFile</name>
    <value>trustedCertificates.jks</value>
    <description>
       Optional. Path to a JKS trusted certificates file.
    </description>
  </property>

  <property>
    <name>xtreemfs.ssl.trustedCertificatesFile.passphrase</name>
    <value>passphrase</value>
    <description>
       Optional. Passphrase for the JKS trusted certificates file.
    </description>
  </property>

  <property>
    <name>xtreemfs.ssl.authenticationWithoutEncryption</name>
    <value>true/false</value>
    <description>
       Enable/Disable grid SSL mode (disabled by default).
    </description>
  </property>
For more information about SSL encryption in XtreemFS see section 3.2.5
Hint: The XtreemFSHadoopClient provides an experimental read- and write buffer (disabled by default). The buffers can be used to speed-up small read-/write requests, but in some cases the overhead of the buffer might slow-down the I/O performance. If you want to use the read-/write buffer in the XtreemFSHadoopClient, you have to enable the buffers and specify the buffer sizes with the following additional properties:
  <property>
    <name>xtreemfs.io.read.buffer</name>
    <value>true</value>
    <description>
      Enable/Disable the read buffer in theXtreemFSHadoopClient
    </description>
  </property>

  <property>
    <name>xtreemfs.io.buffer.size.read</name>
    <value>bufferSize</value>
    <description>
      Buffer size of the read buffer in the XtreemFSHadoopClient
    </description>
  </property>

  <property>
    <name>xtreemfs.io.write.buffer</name>
    <value>true</value>
    <description>
      Enable/Disable the write buffer in the XtreemFSHadoopClient
    </description>
  </property>

  <property>
    <name>xtreemfs.io.buffer.size.write</name>
    <value>bufferSize</value>
    <description>
      Buffer size of the write buffer in the XtreemFSHadoopClient
    </description>
  </property>
- To provide the minimum JobTracker configuration for Hadoop 1.x you also have to add the following property to the
conf/mapred-site.xml:
  <property>
    <name>mapred.job.tracker</name>
    <value>localhost:9001</value>
    <description>Listening address for the JobTracker.</description>
  </property>
This specifies the address where the JobTracker will be running at.
For Hadoop 2.x you have to add the following property to the etc/hadoop/mapred-site.xml:
  <property>
    <name>mapreduce.framework.name</name>
    <value>yarn</value>
  </property>
and the following properties to etc/hadoop/yarn-site.xml:
  <property>
    <name>yarn.nodemanager.aux-services</name>
    <value>mapreduce_shuffle</value>
  </property>

  <property>
    <name>yarn.nodemanager.aux-services.mapreduce_shuffle.class</name>
    <value>org.apache.hadoop.mapred.ShuffleHandler</value>
  </property>
- Finally you are now able to start the JobTracker and the TaskTracker by running 'bin/start-mapred.sh' (Hadoop 1.x) or the ResourceManager and Nodemanager by running 'sbin/start-yarn.sh (Hadoop 2.x) from within the Hadoop root-directory.
Congratulations! You successfully finished the quick start guide of the XtreemFS-Hadoop integration and are now able to use your Hadoop applications like as is well known or go on with the tutorials available on hadoop.apache.org.
Appendix C
Client Library libxtreemfs
The XtreemFS client functionality is bundled into a library libxtreemfs. Currently, this library is available as C++ and Java version with an almost identical feature set. Both versions are intended to run on a variety of platforms. As of June 2012, both versions work on Linux, Windows, MacOSX and Solaris (other platforms probably also work, but were not tested). The libxtreemfs is also used internally by the XtreemFS components e.g., the FUSE Client mount.xtreemfs uses the C++ libxtreemfs and the HDFS implementation is based on the libxtreemfs for Java.
You can use each version of the libxtreemfs to integrate XtreemFS directly in your application. This way you avoid the overhead and the limitations of FUSE. For instance, you can read and write more than 128 kB data with a single read or write command and you avoid unnecessary copying between kernel and user space. The only drawback compared to using the FUSE Client mount.xtreemfs is that the libxtreemfs currently has no advanced caching functionality while FUSE inherently supports read-ahead and caching of file data.
C.1 General Interface
Both versions of the libxtreemfs have an almost identical design and interface. The functionality is provided by the following three main classes:
- Client
A Client object is initialized with the list of DIR replicas of a single XtreemFS installation.
It provides methods to resolve an UUID and for volume maintenance e.g., creating, deleting and listing volumes.
Most users will need only the OpenVolume method which returns a Volume object for a given XtreemFS volume name.
- Volume
A Volume object provides methods for the creation, deletion and renaming of files on the particular volume. These methods require the path to the file or directory as parameter and usually result into metadata operations executed on a MRC server. In order to read and write files, the file has to be opened with the OpenFile method which returns a FileHandle object.
- FileHandle
The FileHandle object has to be used to read or write data to/from a file. There are also methods for acquiring and releasing advisory locks. All these operations usually will be executed on the OSD which holds the replica of the file.
All operations require a UserCredentials object as parameter which contains the name of the user and the list of groups on which behalf the request shall be executed on the server. Currently, this information is only evaluated by the MRC when checking the file permissions. Additionally, the provided UserCredentials will be ignored if the SimpleX509AuthProvider authentication provider is enabled on the MRC and the client uses a user certificate. Then, the UserCredentials will be overwritten at the MRC with the content of the client's user certificate (see section 7.1.2).
Some administrative operations (e.g., creation and deletion of volumes) also require an Auth object. This Auth object allows to implement additional authorization between client and server. As of June 2012, the available implementations are the admin_password mechanism or none. Please see the available examples how to initialize the Auth object properly.
C.2 Using the C++ libxtreemfs
The interface of the C++ libxtreemfs is defined in the three files client.h,
volume.h and file_handle.h which are located in the directory
cpp/include/libxtreemfs/ in the XtreemFS sources. You can retrieve the
sources from our Github Project page at http://github.com/xtreemfs/xtreemfs.
Please note, that there are currently no build targets provided yet which allow to build a dynamic version of the libxtreemfs library. If you want to try out the C++ libxtreemfs, we recommend to start with the provided sub project example_libxtreemfs which statically links the libxtreemfs. Therefore, please follow the following instructions. Specific example commands are given for Linux. As mentioned above, you can also successfully compile the C++ libxtreemfs on other platforms e.g., Windows.
- Install required libraries and dev(el) packages.
In particular, you need boost and libssl-dev. On a Unix plattform, you also need libfuse-dev or you have to comment out the respective portions in the CMake configuration manually. At last, you have to install "cmake" which generates the build system.
- Check out the XtreemFS master.
git clone https://github.com/xtreemfs/xtreemfs.git
- Compile the Client.
Currently you can only compile or all nothing, so the FUSE client mount.xtreemfs will be automatically compiled and the binary "example_libxtreemfs", too.
cd xtreemfs
make client_debug
The Makefile target "client_debug" is identical to the default "client" except that it also enables debug symbols.
- Run the example_libxtreemfs.
cd cpp/build
./example_libxtreemfs
- Use the example code as basis for own modifications.
Now modify cpp/src/example_libxtreemfs/example_libxtreemfs.cpp to suit your needs.
"make client_debug" was only needed the first time for letting CMake generate the Makefiles to build everything. From now on, just run "make" inside cpp/build and it will compile the changed code.
C.3 Using the libxtreemfs for Java
The libxtreemfs for Java can be found in the XtreemFS sources in the directory
java/servers/src/org/xtreemfs/common/libxtreemfs/. You can retrieve the
sources from our Github Project page at http://github.com/xtreemfs/xtreemfs.
Have a look at the unit test "testMinimalExample()" in the file ClientTest.java4 for a minimal example how to use the library. Another example is the HDFS implementation which can be found below contrib/hadoop/.
The libxtreemfs for Java is currently not separated from the remaining server Java code. Consequently, you'll find the available functionality as part of the XtreemFS.jar which is generated by "make server".
Appendix D
Command Line Utilities
- lsfs.xtreemfs (formerly xtfs_lsvol)
- Lists the volumes on an MRC.
- mkfs.xtreemfs (formerly xtfs_mkvol)
- Creates a new volume on an MRC.
- mount.xtreemfs (formerly xtfs_mount)
- The XtreemFS client which mounts an XtreemFS volume locally on a machine.
- rmfs.xtreemfs (formerly xtfs_rmvol)
- Deletes a volume.
- umount.xtreemfs (formerly xtfs_umount)
- Un-mounts a mounted XtreemFS volume.
- xstartserv
- Tool for manually starting/stopping XtreemFS servers, e.g. for testing and development.
- xtestenv
- Tool for automatic set-up of a test environment and for executing the autotests.
- xtfsutil
- XtreemFS's swiss army knife.
- xtfs_cleanup
- Deletes orphaned objects on an OSD, restores orphaned files and removes obsolete file versions.
- xtfs_chstatus
- Changes the status of an OSD.
- xtfs_snap
- Creates, lists and deletes snapshots.
- xtfs_mrcdbtool
- Dumps and restores an XML representation of the MRC database.
- xtfs_remove_osd
- Relocates all files stored on an OSD in order to remove the OSD from the system.
- xtfs_scrub
- Examines all files in a volume for wrong file sizes and checksums and corrects wrong file sizes in the MRC.
Index (showing section)
- Access Policy, 7.2
- Authorize All,
7.2
- POSIX ACLs, 7.2
- POSIX Permissions,
7.2
- Volume ACLs, 7.2
- allow_others option, 4.3
- allow_root option, 4.3
- Architecture, 2.4
- Authentication, 2.3
- Authentication Provider,
3.2,
7.1
- NullAuthProvider,
7.1
- SimpleX509AuthProvider,
7.1
- Authorization, 2.3
- Authorize All Access Policy,
7.2
- CA
- Certificate Authority,
3.2
- Certificate, 2.3,
3.2
- Certificate Authority, 3.2
- Client, 2.4
- Create Volume, 4.2
- Credentials, 3.2
|
- Delete Volume, 4.2
- DIR, 2.4
- Directory Service, 2.4
- fileID, 5.3
- FUSE, 2.4
- Hadoop
- Integration, B.1
- init.d, 3.3
- Java Keystore, 3.2
- JKS, 3.2
- Metadata, 2.4
- Metadata and Replica Catalog,
2.4
- Metadata Server, 2.4
- mkfs.xtreemfs, 4.2
- Mount, 4.3
- mount.xtreemfs, 4.3
- Mounting, 2.4
- MRC, 2.4
|
- NullAuthProvider, 7.1
- Object, 2.4
- Object Storage Device, 2.4
- Object-based File System,
2.4
- OSD, 2.4
- OSD Selection Policy, 7.3
- PKCS#12, 3.2
- Policy
- Access Policy, 7.2
- OSD Selection Policy,
7.3
- Striping Policy, 2.4,
7.4
- POSIX ACLs Access Policy,
7.2
- POSIX Permissions Access Policy,
7.2
- RAID0, 2.3, 7.4
- rmfs.xtreemfs, 4.2
- SimpleX509AuthProvider, 7.1
- SSL, 2.3
- Status Page, 3.3
- Storage Server, 2.4
- Stripe Size, 7.4
- Striping, 7.4
- Stripe Size, 7.4
- Striping Policy, 2.4,
7.4
- Striping Width, 7.4
|
- umount.xtreemfs, 4.3
- Unmount, 4.3
- user_allow_other option,
4.3
- UUID, 3.2
- VFS, 2.4
- Volume, 2.4, 2.4
- Create, 4.2
- Delete, 4.2
- Mount, 4.3
- Un-mount, 4.3
- Volume ACLs Access Policy,
7.2
- X.509, 2.3, 3.2
|
Footnotes:
1 s e e h t t p : / / o p e n d m k . j a v a . n e t / a n d h t t p : / / j a v a . s u n . c o m / p r o d u c t s / j d m k /
2 h t t p : / / g a n g l i a . s o u r c e f o r g e . n e t /
3 h t t p : / / p y s n m p . s o u r c e f o r g e . n e t /
4 l o c a t e d i n t h e X t r e e m F S s o u r c e s a t j a v a / s e r v e r s / t e s t / o r g / x t r e e m f s / c o m m o n / l i b x t r e e m f s /
File translated from
TEX
by
TTH,
version 4.03.
On 12 Mar 2015, 14:01.